
This post may contain affiliate links. If you use these links to buy something I may earn a small commission at no cost to you. Thanks.
…
It is a little surprising to me that it has taken soooo long for me to actually write up an elephant pattern. You would think it would have been one of my first designs since it is my mascot and all!
Someone did ask why it wasn’t ‘Auburn’ though. Sadly, auburn isn’t actually easy to find in a yarn color. And I did worry that it might look a little like a wooly mammoth instead of an elephant! lol! (future pattern idea maybe…)
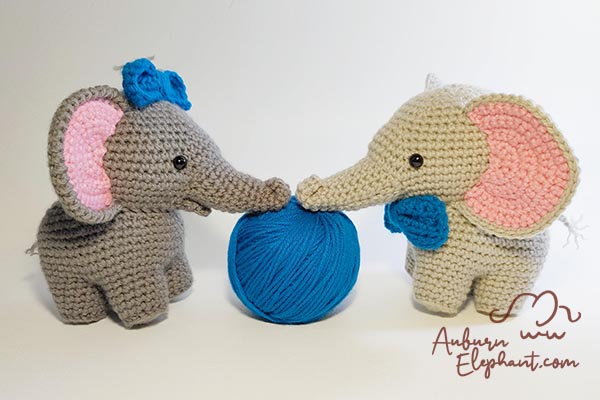
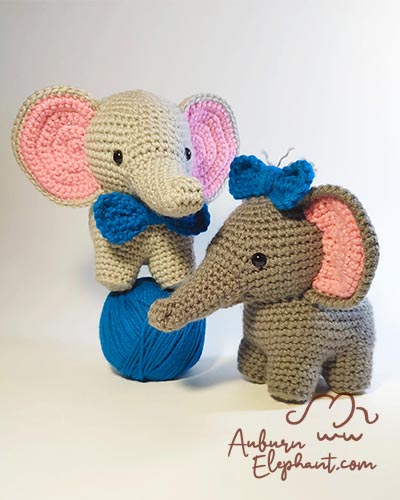
Anyway! This pair of little elephants is finally here. Mortimer and Millie are just adorable as a duo or on their own. The patterns are the same except for the placement of their bows. You can also leave those off and give them other accessories if you’d like. I hope you enjoy these two as much as I do!
You can find the FREE written pattern below with a few photos and videos to help along the way. You can also opt for the Ad-Free PDF download from Ravelry or ETSY that will have even more photos if you need the extra help. Or if you just like having the PDFs. I appreciate being able to print off patterns to make notes along the way. Plus, I always have too many tabs open in my browser! lol!

I hope you enjoy this crochet pattern and that I’ve made it easy enough to follow. If you have any questions you can contact me at auburnelephant@gmail.com OR through my web site www.auburnelephant.com. I’d also love to see your finished creations! Connect with me on Facebook or Instagram- @AuburnElephant!
A couple of disclaimers: This pattern is intended for personal use only. You are welcome to use the pattern to make and sell products, to keep for yourself, or to give away as gifts. I would appreciate receiving credit and a link back to the site. Please do not republish or distribute the pattern in any way, or use my photos in your listings.
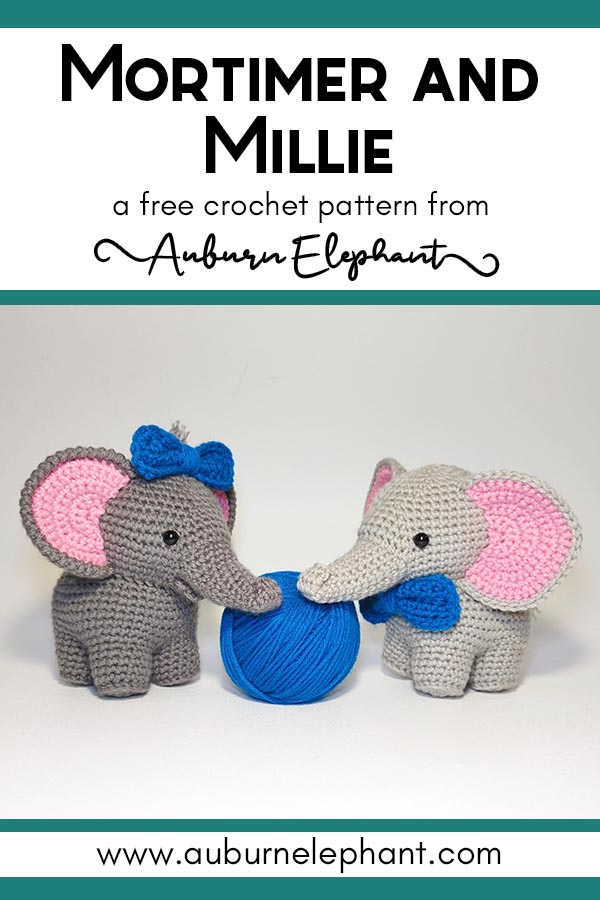
Mortimer and Millie
Supplies Needed:
- Big Twist Value Yarn
, Medium Worsted Weight 4 (100% Acrylic, 371 yds, 6 oz) Soft Grey or Medium Grey, 1 skein- approx. 200 yds, Medium Rose, 1 skein- approx 12 yds, Sapphire, small amount for bow
- G/6 4.25mm
- Polyfil
- Needle, for weaving in ends
- Safety eyes, 10mm (2)
- T-Pins, for placing pieces (optional)
Stitches/Terminology Used (US):
- Ch- Chain
- Sl st- Slip stitch
- St(s)- Stitch(es)
- SC- Single Crochet
- DEC- Single Crochet Decrease, Using the Invisible Decrease method, insert hook up through front loops of next 2 stitches, yarn over, pull through front loops, yarn over, pull through to finish decrease
- 2SC- Single Crochet Increase- 2 SC in same stitch to increase
- BPSC- Back Post Single Crochet
- FPSC- Front Post Single Crochet
- Crab Stitch/Reverse SC (Optional for Ear Style 3)
- HDC- Half Double Crochet (Optional for Ear Style 4)
Notes:
- Pattern is worked in joined rounds, unless noted. Each round will begin with a Ch 1 and end with a sl st to the first stitch of the round. The first stitch of a round will be worked in the same as joining. Chains do NOT count as stitches. If you need help with this technique, you can find my tutorial HERE.
- This pattern is made almost completely in one piece. Except for the ears, tail, and bow/tie, you will crochet all the pieces together. You’ll begin with the legs, then join them together and crochet the body. We’ll leave openings with FPSC, chains, and skipped spaces that will be rejoined later to continue different parts.
- We’ll use FPSC to start different openings throughout the elephant. These create stronger attachment points. When reattaching to the opening, you’ll work into the tops of those FPSC.
- Watch your counts on the rounds with FPSC sections. The first stitch worked after the last FPSC may look like it is part of the post stitch when it should actually be the next worked. If you count out the remaining stitches of the round, you should be able to check yourself.
- Gauge for this project is not very important. You want to make sure that your stitches are tight enough so that your stuffing doesn’t show through and that your pieces hold their shape. If you need to go down a hook size to maintain tight stitches that is fine. As I made it, my elephant stands about 6.5” tall (not counting tuft or bow).
Legs
Make 4
1) Using the Magic Ring technique (OR Ch 3 and join with a sl st to first ch to form a ring) SC 8 into ring. Pull tight to close. (8)
2) 2SC in each st around. (16)
3) BPSC in each st around (16)
4-7) SC in each st around (16)
Finish off. You can weave in your ends here if you’d like, or leave them as stuffing later. I prefer to leave them but you will have to work around them when it comes to attaching the body.
Body
This section will start with a circle for the belly. You’ll join each leg in Round 3 and then you’ll continue around the outside of the legs to build up from there.
1) Using the Magic Ring technique (OR Ch 3 and join with a sl st to first ch to form a ring) SC 8 into ring. Pull tight to close. (8)
2) 2SC in each st around. (16)
Next Round will attach the legs. See photo guide for Round 3 below or watch the video for more details.
3) SC in next st, sl st through 3 sts of Leg 1 and next 3 sts of Round 2, 2SC in next st of Round 2, sl st through 3 sts of Leg 2 and next 3 sts of Round 2, 2SC in next st of Round 2, sl st through 3 sts of Leg 3 and next 3 sts of Round 2, 2SC in next st on the circle, sl st through 3 sts of Leg 4 and next 3 sts of Round 2, SC into the same as first st of the round. (8 SC, 12 Sl St)
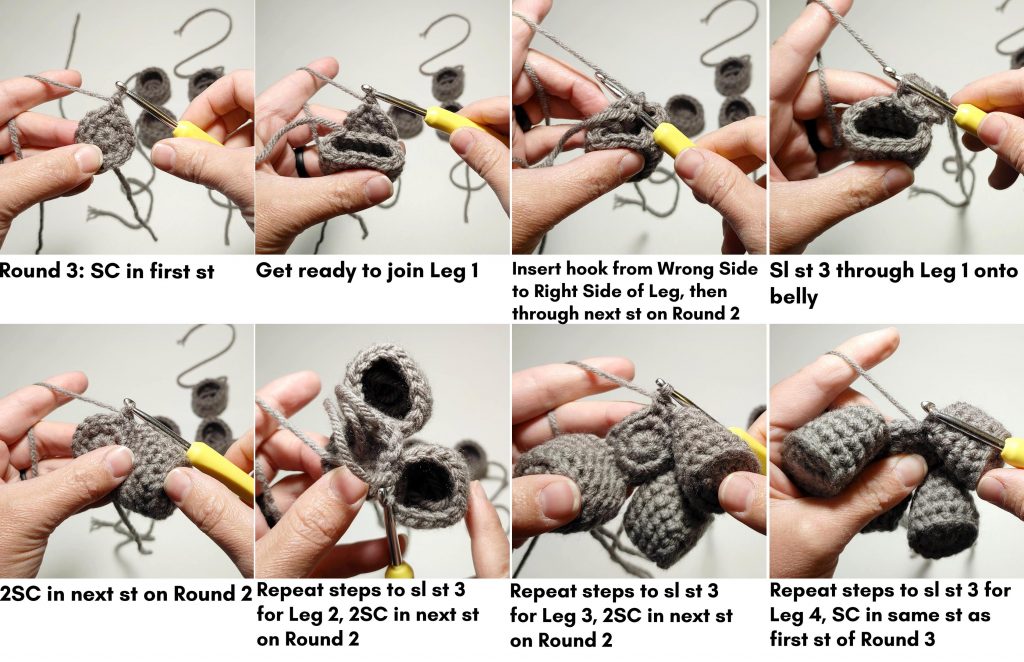
For this round, you’ll be going around the outside of the leg. Be sure to only use the unworked stitches and not the joined ones. The decreases will combine one stitch from Round 3 to one stitch from the leg.
4) *DEC, SC in next 5 sts, 2SC in next st, SC in next 5 sts, DEC;* Repeat from * to * around. (56)
5) *DEC, SC in next 3 sts, 2SC in next st, SC in next 2 sts, 2SC in next st, SC in next 3 sts, DEC;* Repeat from * to * around. (56)
6) *DEC, SC in next 24 sts, DEC;* Repeat from * to * around. (52)
7-11) SC in each st around. (52)
12) SC in next 6 sts, DEC, SC in next 12 sts, DEC, SC in next 10 sts, DEC, SC in next 12 sts, DEC, SC in next 4 sts. (48)
13) SC in next 6 sts, DEC, SC in next 8, DEC, FPSC in next 14 sts, DEC, SC in next 8 sts, DEC, SC in next 4 sts. (30 SC, 14 FPSC)
You want your FPSC to be centered on the chest. If yours aren’t, restart the round and adjust the first SC section (add or subtract SC from before and after). Just remember to carry that change through the rest of Round 13 and 14.
14) (SC in next 2 sts, DEC) x 4, Ch 7, sk 14 FPSC, (DEC, SC in next 2 sts) x 3, DEC. (22 SC, 7 Ch, 14 skipped)
You’ll work into the Chains in the next round. For the decreases on the Chains, you can skip 1 instead. You can’t really use the invisible decrease here.
15) *SC in next 2 sts, DEC;* Repeat from * to * around. SC in last. (22)
16) *SC in next st, DEC;* Repeat from * to * around, SC in last. (15)
17) DEC around, SC in last. (8)
Finish off, use the tail to sew hole closed. Weave in the end.
Stuff the body, be sure to start in the legs to make sure they are full.


Head
Attach yarn at the arrow (see photo below). You will work 3SC into each of the “corner” spaces. The corners are actually the sides of the stitches before and after the chains of Round 14.
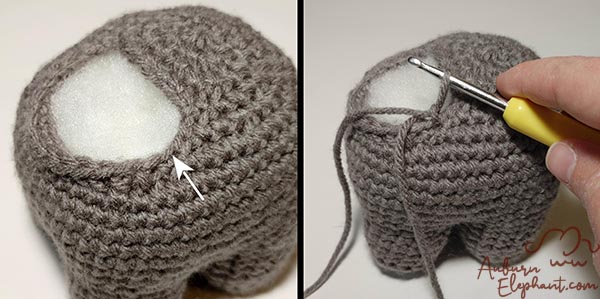
Work over the yarn tail for several stitches and then tuck it inside to avoid having to weave in an extra end.
1) 3SC into corner space, 2SC in the tops of each FPSC, 3SC into the corner space, 2SC in next 7. (48)
2) SC in each st around. (48)
3) SC in next 14, FPSC in next 6, SC in remaining sts around. (42 SC, 6 FPSC)
Your FPSC section should be centered on the chest, this will be the opening for the trunk. If it is not centered, adjust the round (add or subtract SC from before or after). Just be sure to carry that change through the next round.
4) SC in next 14, Ch 10, Sk 6 FPSC, SC in remaining sts around. (42 SC, 10 Ch, 6 skipped)
5) SC in each st and ch around. (52)
(If you had to make adjustments in Round 3, you will also need to adjust the beginning SC section in Rounds 6-10. You should do one less SC before the DEC than you started with in Round 3. For example, if you adjusted Round 3 to start with 12 SC, Round 6-10 will start with 11 SC.)
6) SC in next 13, DEC, SC in next 9, DEC, SC in remaining sts around. (50)
7) SC in next 13, DEC, SC in next 7, DEC, SC in remaining sts around. (48)
8) SC in next 13, DEC, SC in next 5, DEC, SC in remaining sts around. (46)
9) SC in next 13, DEC, SC in next 3, DEC, SC in remaining sts around. (44)
10) SC in next 13, DEC, SC in next, DEC, SC in remaining sts around. (42)
11) SC in each st around. (42)
12) *SC in next 4, DEC;* Repeat from * to * around. (35)
13) *SC in next 3, DEC;* Repeat from * to * around. (28)
14) *SC in next 2, DEC;* Repeat from * to * around. (21)
15) *SC in next st, DEC;* Repeat from * to * around. (14)
16) DEC around. (7)
Finish off. Leave a long tail to sew the hole closed. Weave in end.
Stuff head and neck. Make sure that the body is as firm as you would like. If it is too soft, your elephant will have a hard time standing upright, the head can make it a little top-heavy.
You can place your safety eyes at this point if you are using them, I explain where I placed mine in the trunk section below. You can also wait until you have a few rounds of the trunk completed. I like to have some of the trunk on first because it gives a better idea of how your elephant will look. (The trunkless elephant looks a little funky for sure…) If you prefer to embroider your eyes on you can wait until your elephant is completely finished or now as well.
Trunk
Attach yarn at the arrow (see photo below). You will work SC into each of the “corner” spaces. The corners are actually the sides of the stitches before and after the chains of Round 4.
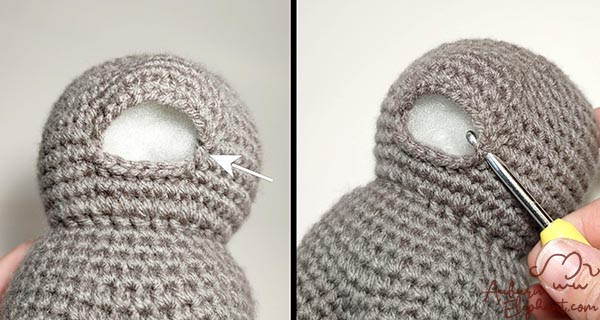
Work over the yarn tail for several stitches and then tuck it inside to avoid having to weave in an extra end.
1) SC in corner space, SC in each FPSC, SC in corner space, SC in each remaining. (18)
2) SC in each st around. (18)
3) DEC, SC in next 5, DEC, SC in remaining sts. (16)
4) DEC, SC in next 4, DEC, SC in remaining sts. (14)
5-6) SC in each st around. (14)
If you want to use safety eyes and didn’t place them earlier, now is the time. I placed mine between Rounds 6 and 7 of the head and about 11 stitches apart, spaced evenly on either side of the trunk. Be sure to position both eyes and look at your elephant from several angles before securing the backs on.
7) DEC, SC in next 3, DEC, SC in remaining sts. (12)
8) SC in next 2, DEC, SC in remaining sts. (11)
9) SC in next st, DEC, SC in remaining sts. (10)
Stuff the trunk, make sure that the stuffing goes up to the head so that there’s no gap between the head and trunk.
10) SC in each st around. (10)
11) SC in next 4, DEC, SC in next 2, DEC. (8)
12) SC in each st around. (8)
Stuff a little more. You want the very end of the trunk to be flat so that it can roll up.
13) SC in next 5, DEC, SC in last. (7)
14) SC in next 4, DEC, SC in last. (6)
15) SC in each st around. (6)
Finish off. Leave a long tail to sew closed and shape the trunk. Curl the end of the trunk up to about Round 9 and sew down the end. You could also curl it under if you like or leave it long.
Ears
You have a choice between 4 different styles of ears for your elephant. Style 1 has a simple SC border. Style 2 has a Crab/Reverse SC stitch border. Style 3 has a ruffled edge. Style 4 is the biggest and shaped more like an actual elephant ear.
Notes for the Ears:
- For each Style, Rows will begin with a Ch 1 and turn.
- For each Style, you will need 2 in pink and 2 in grey.
- Styles 1-3 will begin with the same base semi-circle.
- Styles 1-3 don’t have a right or left side.
- Style 4 does have a right and left. The difference is which piece is on top when you join. For the right ear, you’ll crochet the pieces together with the pink side on top. For the left ear, you’ll want the grey piece on top. Hold them up to your elephant to make sure.
- I would suggest making the pink pieces first since you will finish those off and continue off of the grey pieces to join.
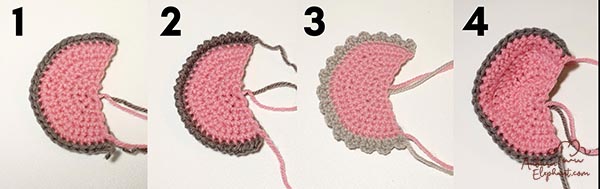
Style 1-
Make 2 in Pink
Make 2 in Grey
1) Using the Magic Ring technique (OR Ch 3 and join with a sl st to first ch to form a ring) SC 4 into ring. Do NOT join. Pull ring tight. (4)
2) 2SC in each st around. (8)
3) *SC in next, 2SC;* Repeat from * to * around. (12)
4) *SC in next 2, 2SC;* Repeat from * to * around. (16)
5) *SC in next 3, 2SC;* Repeat from * to * around. (20)
6) *SC in next 4, 2SC;* Repeat from * to * around. (24)
7) *SC in next 5, 2SC;* Repeat from * to * around. (28)
8) *SC in next 6, 2SC;* Repeat from * to * around. (32)
Finish off Pink pieces. (You can leave a pink tail to stitch on the pink side to the head, or you can weave it in.) Do NOT finish off Grey pieces, continue off of the piece to join the two sides together.
Join for Styles 1, 2, and 3
Ch 1, turn. Place Pink piece on top of Grey piece, insert hook through the first stitch on the pink piece and through the corresponding stitch on the Grey piece, SC. Continue around to SC the two pieces together. Finish off, leave a long, long tail to sew ear onto head.
Style 2-
Follow Rows 1-7 and Join of the Style 1 pattern but do not finish off once you’ve joined the two pieces together.
Ch 1, do not turn. Crab stitch back around.
Finish off, leave a long, long tail to sew ear onto head.
Style 3-
Follow Rows 1-7 of the Style 1 pattern but with a different stitch pattern for the joining stitches.
Ch 1, turn. Place Pink piece on top of Grey piece, insert hook through the first stitch on the pink piece and through the corresponding stitch on the Grey piece, SC, Ch 3, SC in next st, Ch 1, SC in next st, Ch 3; Repeat from * to * across. SC in last.
Finish off, leave a long, long tail to sew ear onto head.
Style 4-
Make 2 in Pink
Make 2 in Grey
1) Using the Magic Ring technique (OR Ch 3 and join with a sl st to first ch to form a ring) SC 5 into ring. Do NOT join. Pull ring tight. (5)
2) 2SC in next 2, 2DC in next 2, (DC, SC) in last st. (10)
3) SC in first, 2DC in next, (DC in next, 2DC) 2 times, (SC in next, 2SC) 2 times. (15)
4) (SC in next 2, 2SC) 2 times, (DC in next 2, 2DC) 2 times, DC in next 2, (DC, SC) in last st. (20)
5) SC in first, DC in next 2, 2DC in next, (DC in next 3, 2DC) 2 times, (SC in next 3, 2SC) 2 times. (25)
6) HDC in next 4, 2HDC, HDC in next 4, SC in next st, (DC in next 4, 2DC) 2 times, DC in next 4, (DC, SC) in last st. (29)
Finish off Pink pieces. (You can leave a pink tail to stitch on the pink side to the head, or you can weave it in.) Do NOT finish off Grey pieces, continue off of the piece to join the two sides together.
Join for Style 4
Ch 1, turn. Place pink piece on top of grey piece, insert hook through the first stitch on the pink piece and through the corresponding stitch on the grey piece, SC. Continue around to SC the two pieces together. Finish off leave a long, long tail to sew ear onto head. (Repeat for opposite ear, except place the grey piece on top.)
Attaching ears
Using T-Pins, place ears on either side of the elephant’s head. They should form a slight ‘C’ shape toward the front. Pin them in place and check to see that they are evenly spaced from the eyes and the top of the head. Use the grey tail to sew down the grey side of the ear, use the pink tail to sew down the pink side of the ear. Fasten off and weave in the ends.
Tail
For the tail, attach at the rear and chain both strands to a length of about 1”, knot the end and fray the strands.
Optional Details
Mouth
Leave a long starting tail to sew on.
Ch 6,
1) Starting in 2nd ch from hook, SC 5. Ch 1, turn. (5)
2) DEC, SC in next st, DEC. Ch 1, turn. (3)
3) SC3TOG. Ch 1, turn. (1)
4) SC. (1)
Finish off, weave in end.
Using T-Pins, place your mouth under the trunk, close to the neck. Use the starting tail to sew it on.
Hair tuft
Take about a 12” strand of yarn (this is more than is necessary but longer is easier to tie) folded in half and pull through the top of a stitch on your elephant’s head, pull the ends even and knot the yarn. You can trim it to the length you like and fray the ends.
Bow
Ch 13,
1) Starting in 2nd Ch from hook, HDC 12. Ch 1, turn. (12)
2-3) HDC in each st across. Ch 1, turn. (12)
4) Border- SC in each st around, 2SC in each corner.
Finish off, leave a long tail to wrap the center and to attach.
Pinch the bow in the middle, using your tail and a needle, stitch through the middle and then wrap the end around the center of the bow until it is as full as you want. Knot and tie the end on the back side of your bow. Use the remaining tail to sew onto your elephant.
You can place your bow on the top of the head, over one ear, under the trunk, or over the tail. You can leave it off altogether or use whatever style of bow you like!
Check out some of these other amigurumi projects!

Thank you so very much. My grandaughter is having a baby boy in May. Theme for baby shower is elephants and this is the first elephant pattern that I have liked. I love it!!
How exciting! I’m happy you like the pattern. This will make a great gift! Thank you