
This post may contain affiliate links. If you use these links to buy something I may earn a small commission at no cost to you. Thanks.
…
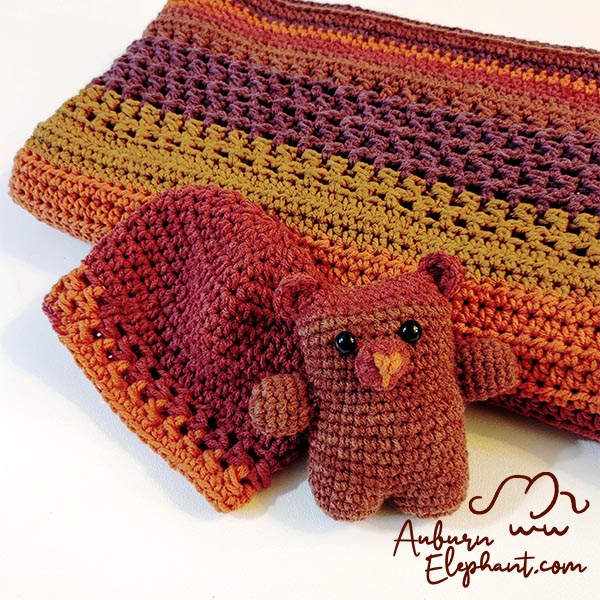
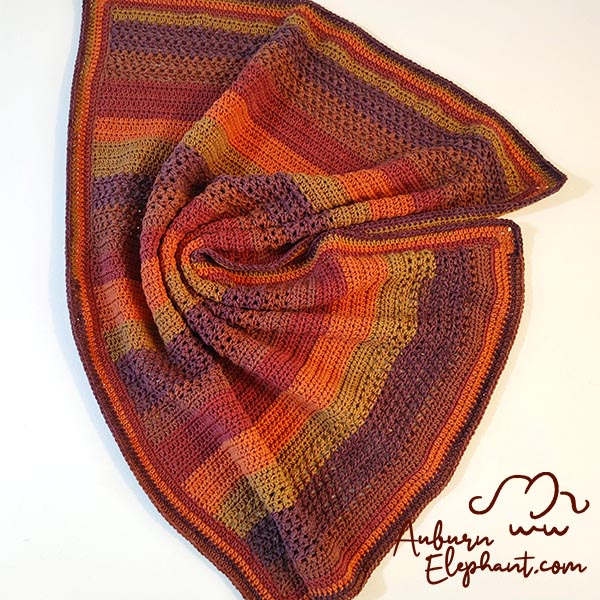
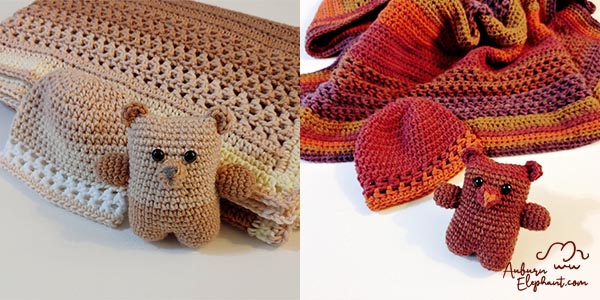
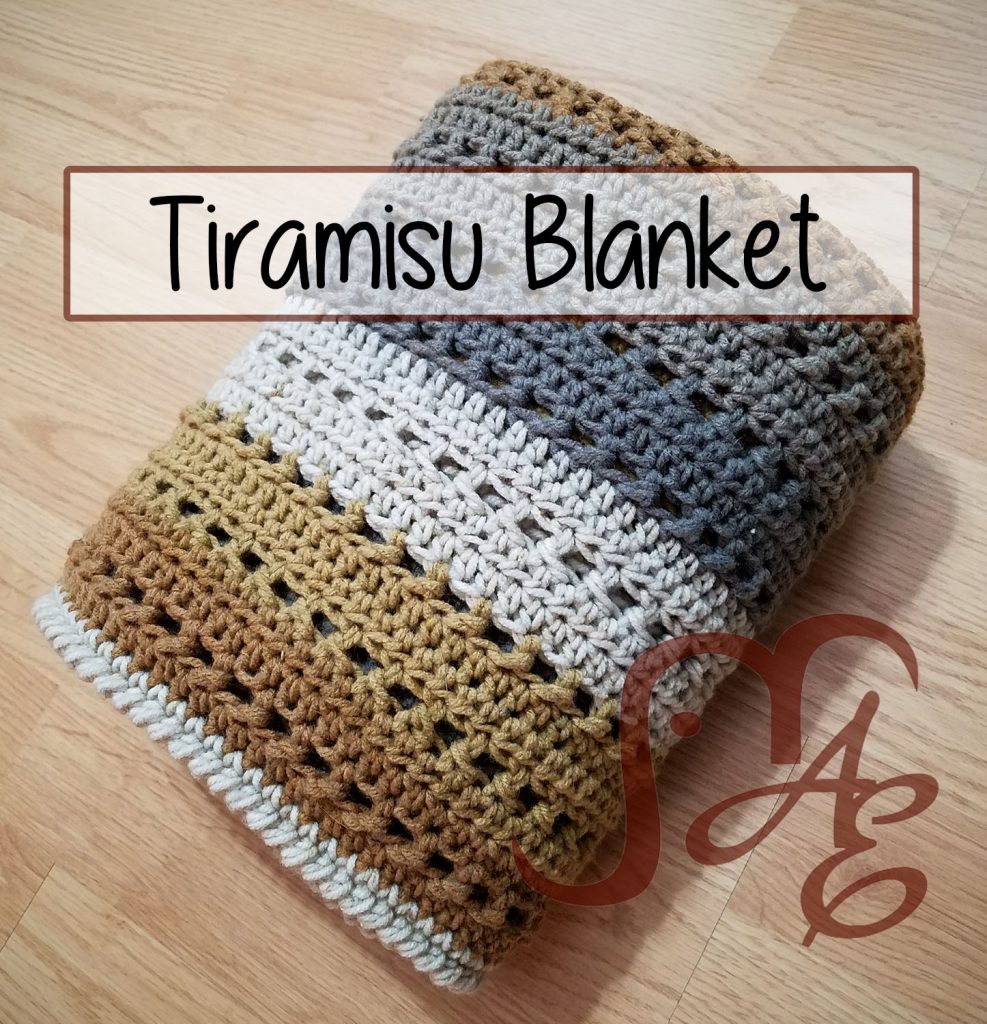
What feels like forever ago, I bought a bunch of Caron Big Cakes that were on clearance at Michael’s. I was super excited about it and designed the Tiramisu Blanket. It has been pretty popular and I was really pleased with how it turned out. Since then I’ve been staring at 4 more skeins of those Big Cakes wondering what else I could do. I wanted to use the HDC wrap stitch again and so this Autumn Crisp Blanket was born!
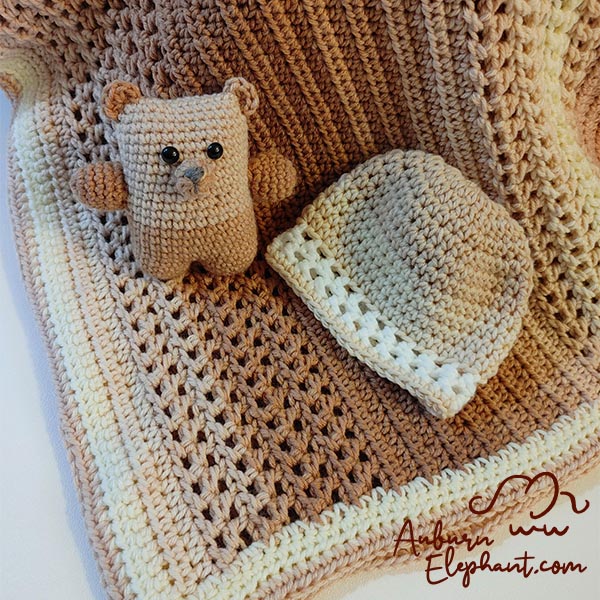
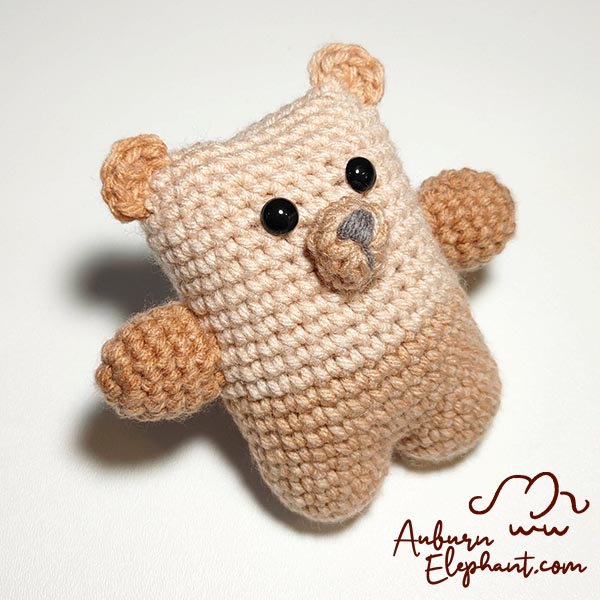
I love the way the stripes work with the Wrap and HDC sections. It has texture without being difficult or overwhelming. It’s open enough to not be heavy but still warm. Once I had finished this blanket in about the size that I wanted, I realized I had some yarn leftover and didn’t want it to go to waste. I thought I’d see if I could make a little stuffed companion and Bearly Bear was born! Named by my 8yo because I “barely” had enough yarn to make him! Lol! But I actually had even more yarn left after that and thought what better accessory to add than a matching hat! It worked out better than I hoped but did take every bit of yarn!
I have had troubling finding more of these skeins in the stores lately, which is a bummer. I’m not sure if they are completely being discontinued or if they are just working through some colorway changes. In any case, if you are like me and have some of these stockpiled waiting for the perfect project, this is it! If you don’t have any and can’t find some there are other substitutions you can make.
I made the first set using 2 Caron Big Cakes in Cranberry Crisp. I made a second set using 2 Caron Jumbo Ombre skeins in Sepia. The Ombre skeins have a little less yardage so I needed a little filler from a coordinating skein. One of my testers for this set used Caron Lovely Cakes and said she needed 3 skeins but had some yarn leftover. If you aren’t worried about the self striping you can substitute any worsted yarn really. You just need approximately 1200 yards to make the 3-piece set.

I hope you enjoy this crochet pattern and that I’ve made it easy enough to follow. If you have any questions you can contact me at auburnelephant@gmail.com OR through my web site’s contact page. I’d also love to see your finished creations! Connect with me on Facebook or Instagram!
A couple of disclaimers: This pattern is intended for personal use only. You are welcome to use the pattern to make and sell products, to keep for yourself, or to give away as gifts. I would appreciate receiving credit and a link back to the site. Please do not republish or distribute the pattern in any way, or use my photos in your listings.
Autumn Crisp Gift Set
Supplies Needed:
- Caron Big Cakes, Medium Worsted Weight 4 (100% Acrylic, 603 yds, 10.5 oz) Cranberry Crisp, 2 skeins, approx 1100 yds for the blanket, 50 yds for Bear, 50 yds for 0-6 mo Hat
- I/9 5.5 mm hook, for blanket and hat
- G/6 4.25 mm hook, for bear
- Polyfil stuffing, for bear
- Safety eyes, 6-10mm (2), for bear (optional)
- Tapestry Needle
- T-Pins, for bear pieces (optional)
Stitches/Terminology Used (US):
- Ch- Chain
- St(s)- Stitch(es)
- Sl st- Slip Stitch
- FHDC- Foundation Half Double Crochet
- HDC- Half Double Crochet
- Post- The tall middle part of a stitch
- SC- Single Crochet
- DEC- Single Crochet Decrease, Using the Invisible Decrease method, insert hook up through front loops of next 2 stitches, yarn over, pull through front loops, yarn over, pull through to finish decrease
- 2SC- SC increase, work 2 SC in the same stitch to increase
- 2HDC- HDC increase, work 2 HDC in the same stitch to increase
Special Stitches:
- HDC Wrap- HDC in next st, yarn over, insert hook behind the post of the last HDC, yarn over, pull through the space, yarn over, pull through all loops. Skip next st.
Notes:
- Gauge for this blanket is 13 HDC x 9 rows = 4” x 4”. My finished blanket size was approximately 35” x 42”.
- If you would like your blanket to be larger or smaller, you can go up or down a hook size. OR add or subtract from the starting row. Just be sure to end on an odd number.
- Keep in mind though if you change the starting length your Caron Big Cakes will not stripe in the same way mine did and you will need more than 2 skeins if you increase the size very much. If you are making this larger, I would suggest creating your own stripes or using a solid color.
- The nature of any of these self-striping yarns is that the color sections are not going to be the exact same lengths. In my example, I was able to get around 4 rows out of each color, but you’ll notice that some are a little more or less than that. I don’t find it terribly distracting. If it bothers you, you can cut the colors when your change happens in the middle of a row. Keeping in mind that doing this will shorten the amount of yarn you have to work with and you may need more than the recommended 2 skeins to make the complete set.
- The hat and bear extras will use almost every inch of yarn in those 2 Big Cakes. If you decide to do a lot of color cutting you may not have enough. You can alway choose to make those in a coordinating yarn if you still want to make the set. If your cut pieces are long enough though, you could join those together to make the set.
- Tips for buying self-striping cakes:
- Check that the colors change in the same order. It has happened to me before that one cake changes backwards to the other in which case the stripes don’t follow the right pattern.
- Choose cakes that end and begin with the same color to limit your cutting. So if you pull from the center, you’ll check to see that the color on the outside of one cake matches the color that is at the center of the next. That way when you need to switch skeins you shouldn’t have to make any adjustments.
- After writing this pattern using Caron Big Cakes, I’ve noticed that they haven’t been as available as they once were. So I also made this set using 2 Caron Jumbo Ombre
skeins. This yarn is slightly thicker than the Big Cakes but has slightly less yardage. The blanket needed 2 less border rounds to reach the size I wanted but I did still run a little short to finish the bear and hat. I was able to use a small amount of white yarn on the hat to finish it.
Set made with Caron Jumbo Ombre in Sepia
Blanket
Using I/9 5.5mm hook
1) Begin with a FHDC 101 OR Ch 103, starting in 3rd chain from hook, HDC 101. Ch 2, turn. (turning chains do not count as a stitch.)
2) HDC in each st across. Ch 2, turn. (101)
3-10) HDC in first st, HDC around the post of the HDC just worked (not around starting ch), Skip 1, *HDC in next st, HDC around post of the HDC just worked, Skip 1;* Repeat from * to * across. HDC in last st. Ch 2, turn. (101 or 50 HDC wraps, 1 HDC) See photo below

11-26) HDC in each st across. Ch 2, turn. (101)
Repeat Rows 3-26 two more times. (Continue repeating this section if you increased the blanket’s width until you reach the desired length.)
Repeat Rows 3-10 one more time (4 total HDC wrap sections) for a total of 83 rows.
84-85) HDC in each st across. Ch 2, turn. (101)
You can also grab the Ad-Free Premium PDF download from Ravelry or Etsy!


Border
I chose to use a simple HDC border (after a SC round). You can choose a different style if you prefer. I would still suggest starting with a SC round as it is a good base. Keep in mind though that a different style may use more or less yarn and you may not have enough for the Bear and Hat.
You can start your border by continuing around from the last row of the blanket or you can choose to cut your colors so that the striping around is more consistent (you should be able to make it all the way around your border before a color change, but that’s not a guarantee). You can also choose to use a coordinating solid color in a similar yarn for your border.
The count for the border doesn’t have to be exact. You want to make sure that your stitches are evenly spaced and that your short sides have about the same and long sides have about the same. Too many stitches on the side will ruffle your border, too few stitches on the side will pucker your blanket. Adjust as necessary.
Continue from the last row of blanket OR Reattach at a corner. Ch 1,
Round 1) SC evenly around the blanket, placing 3 SC in each of the 4 corners. Sl st to first SC of the border to join.
Round 2) Ch 2, HDC in each stitch around, place a (HDC, Ch 3, HDC) in the middle st of each corner. Sl st to first HDC of the round to join.
Rounds 3-5) Ch 2, HDC in each stitch around, place a (HDC, Ch 3, HDC) in the Ch-3 space of the previous round. Sl st to first HDC of the round to join. Fasten off, weave in ends.
Before you begin your Bearly Bear or Bearly Hat, you may want to check that you have enough yarn left to do so. Yarn chicken is exciting if you win but not so much if you lose. If you have a digital kitchen or postage scale, you can weigh what’s left. You should have about 1.7 oz of yarn.
Some options if you don’t have quite that much, or if you want to be on the safe side.
- Use a coordinating color in a similar yarn for Bear’s arms, legs, tail, ears, and nose.
- Choose which is more important to match, hat or bear, and start with that one first.
- Do one or two less border rounds on your blanket.
Bearly Bear
Notes for Bear
- Each piece will be worked in joined rounds. Each round will begin with a Ch 1 and end with a sl st to the first stitch of the round. The first stitch of a round will be worked in the same as joining. Chains do NOT count as stitches. If you need help with this technique, you can find my tutorial at auburnelephant.com/home/joined-rounds.
- I would suggest looking at the yarn remaining in your skein to see what colors you have. You can just keep going wherever you are in the color change, or pick and choose if you have enough. I could tell with the Ombre yarn that I was starting with dark and fading to light. I preferred the darker arms, ears, nose and tail so I made those to start before beginning the legs and body. You can see that it transitioned about midway so it looks like he’s wearing pants! And with the Caron Cakes bear, the color changed toward the end so he’s wearing a hat! All happy coincidences! So if you want to see how it plays out go for it, if you want to design the bear a little more you can as well. Keeping in mind that cutting colors may leave you with less yarn to use.
- Finished size of the Bear is about 5” tall.
- All Bear pieces will be worked using G/6 4.25 mm hook.
Legs
Make 2
Using G/6 4.25 mm hook for all Bear pieces
1) Using the Magic Ring technique (OR Ch 3 and join with a sl st to first ch to form a ring) SC 8 in the ring. Pull ring tight. (8)
2) 2SC in each st around. (16)
3-4) SC in each st around. (16)
Finish off Leg 1. You can weave in your ends or tuck them inside the leg for stuffing. Continue off of 2nd leg to start the body.
Off of Leg 2, Ch 1, SC in next 2. Ch 1, turn. Leave rest of the round unworked. Sl st through last row and 2 sts of Leg 1 to join. Ch 1. Now you will continue around the outside of the legs.
Body
1) SC in next 14 around Leg 1, SC in edge of the joining section, SC in next 14 around Leg 2, SC in other edge of joining section. (30)
2-17) SC in each st around. (30)
18) SC in next 8, DEC, DEC, SC in next 11, DEC, DEC, SC in next 3. (26)
19) SC in next 8, DEC, SC in next 11, DEC, SC in next 3. (24)
Finish off, leave a long tail.
Stuff your bear, be sure to fill down to the legs. Add safety eyes if you choose to. I placed mine between Rounds 14 and 15 about 3 stitches apart. Do whatever suits your eyes though.
Use the tail to sew the top of the bear shut.
Arms
Make 2
1) Using the Magic Ring technique (OR Ch 3 and join with a sl st to first ch to form a ring) SC 6 in the ring. Pull ring tight. (6)
2) 2SC in each st around. (12)
3-6) SC in each st around. (12)
Finish off. You can weave in your ends or tuck them into the arm as stuffing.
Ears
Make 2
Using the Magic Ring technique (OR Ch 2 and working into the 2nd ch from hook) HDC 6 in the ring. Pull ring tight. Do NOT join. Finish off. Leave a long tail to attach.
Nose/Tail
Make 2- One as Nose, One as Tail
1) Using the Magic Ring technique (OR Ch 3 and join with a sl st to first ch to form a ring) HDC 8 in the ring. Pull ring tight. Join with a sl st to the first st of the round. (8)
2) Ch 1, SC in each st around. Join with a sl st to the first st of the round. (8)
Finish off. Leave a long tail to attach. Use starting tail as stuffing for each piece.
You can use a scrap piece of your yarn cake in a lighter or darker color than your nose to stitch on some detail. You could also use a coordinating color or embroidery thread.
Assembly
(See photo below)
Place one ear at each of the top corners of the bear’s head. Sew them down.
Place the arms on either side of the bear, 3-4 rows below the eyes, or about centered on the side of the body. Use a little bit of stuffing to plump them up or you can leave them flat and stitch them down horizontally.
Place the nose centered between the eyes and down slightly. Use the yarn tail to sew it down.
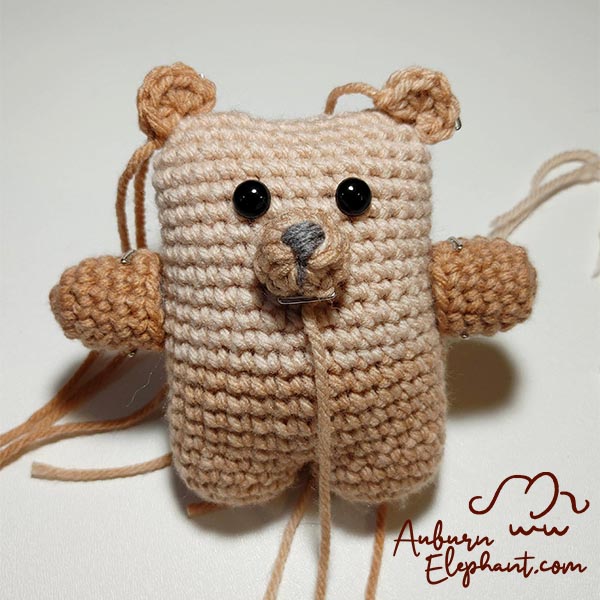
Place the tail on the bear’s back side, about 4-5 rows up from the top of the legs and centered. Sew it down.
Bearly Hat
Notes for Bearly Hat
- Hat is worked in joined rounds. Each round will begin with a Ch 2 and end with a sl st to the first stitch of the round. The first stitch of a round will be worked in the same as joining. Chains do NOT count as stitches. If you need help with this technique, you can find my tutorial at auburnelephant.com/home/joined-rounds.
- This pattern is written in a 0-6 month size. I added this to the bundle to use up the rest of the Caron Big Cakes. If you want to make a larger size, make sure that you have plenty of yarn left or are using a new skein. You can continue increasing until you reach the crown size needed and then add rounds until you reach the length you need. I used the hat sizing guide from this post (How to Crochet Hat in Any Size – free pattern & tutorial).
- Hat will be made using an I/9 5.5 mm hook.
1) Using the Magic Ring technique (OR Ch 3 and join with a sl st to first ch to form a ring) HDC 11 in the ring. Pull ring tight. (11)
2) 2HDC in each st around. (22)
3) *HDC in next st, 2HDC;* Repeat from * to * around. (33)
4) HDC in each st around. (33)
5) *HDC in next 2, 2HDC;* Repeat from * to * around. (44)
6-11) HDC in each st around. (44)
12-13) HDC Wrap rounds. *HDC in first st, HDC around the post of the previous HDC, skip next;* Repeat from * to * around. (44, 22 ‘Wraps’)
14) SC in each st around. (44)
Finish off, weave in ends.

And there you have it! An adorable and easy to gift set however you decide to go. 🙂
While you’re here, check out some of these other Auburn Elephant patterns that make great gifts!
2 thoughts on “Autumn Crisp Gift Set”
Comments are closed.