
This post may contain affiliate links. If you use these links to buy something I may earn a small commission at no cost to you. Thanks.
…
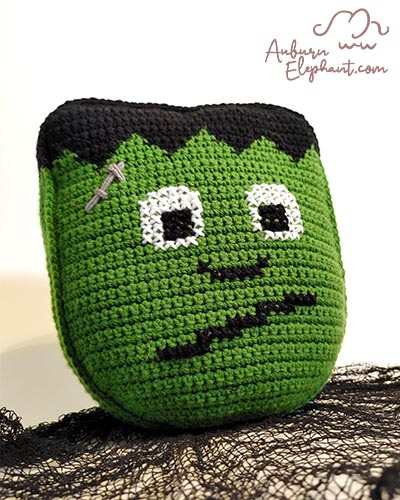
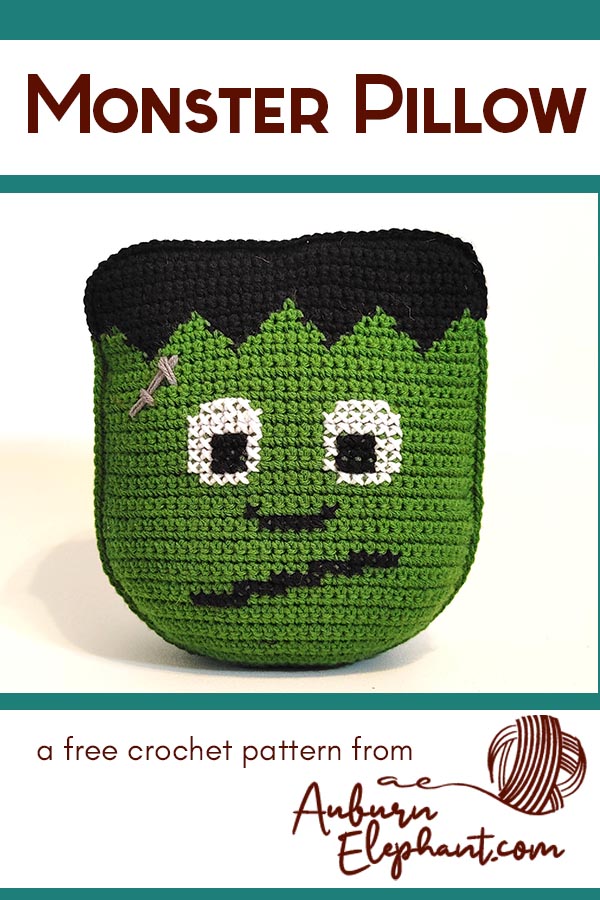
When I think of Halloween, Frankenstein’s Monster is one of the first things that pop into my mind. It’s seriously one of the most iconic Halloween creatures! However, I do get pretty annoyed at the Frankenstein vs Frankenstein’s Monster debate. The latter is correct of course but I understand the ease of simply saying Frankenstein….
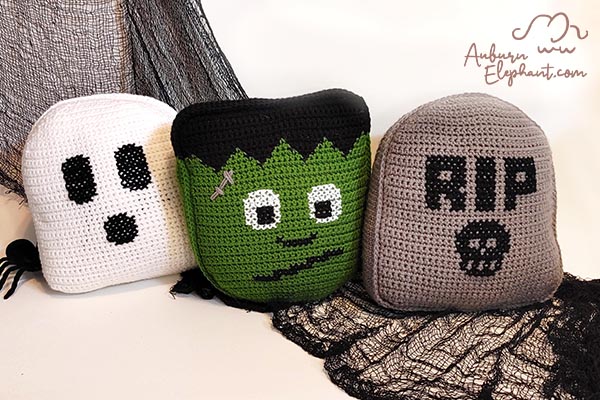
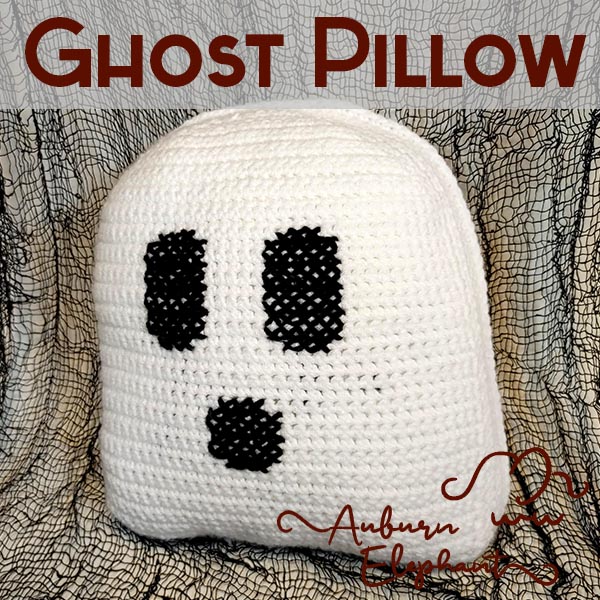
Anyway! To avoid that issue, I’m simply calling this design ‘Monster’. His Ghost and Headstone Pillow friends don’t seem to mind so neither do I. But you can call him whatever you’d like!
I hope you enjoy this crochet pattern and that I’ve made it easy enough to follow. If you have any questions you can contact me through the Contact Page OR directly at auburnelephant@gmail.com. I’d also love to see your finished creations! Connect with me on Facebook or Instagram- @AuburnElephant!
A couple of disclaimers: This pattern is intended for personal use only. You are welcome to use the pattern to make and sell products, to keep for yourself, or to give away as gifts. I would appreciate receiving credit and a link back to the site. Please do not republish or distribute the pattern in any way, or use my photos in your listings.

Supplies Needed:
- Big Twist Value Yarn, Medium Worsted Weight 4 (100% Acrylic, 371 yds, 6 oz) Forest Green, 1 skein- approx 200 yds; Black, 1 skein- approx 75 yds; White, approx 5 yds; Medium Grey, small amount for details
- G/6 4.25mm hook
- Needle
- Polyfil stuffing
Stitches/Terminology Used (US):
- FSC- Foundation Single Crochet
- Sl st- Slip Stitch
- Ch- Chain
- St(s)- Stitch(es)
- SC- Single Crochet
- BPSC- Back Post Single Crochet
- Skip- Skip next stitch
Notes:
- Please read through the pattern in its entirety before beginning.
- The graph is located at the very bottom of the page.
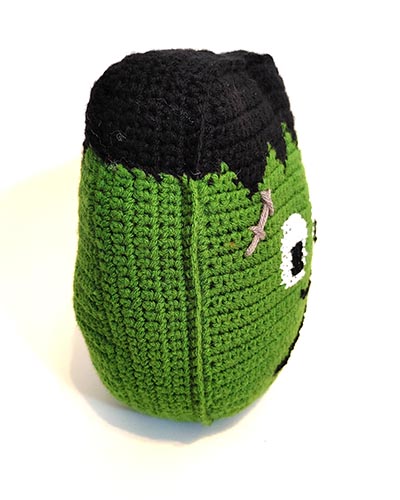
- This pattern will have 2 pieces. One is a flat panel that will have your face design on it and the other will be another panel but with sides that will attach to the front.
- This is written with the design partially graphed and partially cross stitched on, you can also do this all as a graph with color changes as you go or all cross stitched. I found the combo to be the way that made the most sense but you can choose what works best for you. You’ll be starting at the widest part of the graph which is actually the top of your Monster’s head. You’ll graph the hair and then cross stitch the rest of the face. Your front and back panel will both graph the hair line, but you will only graph features on to one panel (unless you want to make your Monster two-faced which would also be cool).
- If you need instruction on how to cross stitch, you can find my tutorial HERE.
- If you choose to crochet the entire graph as you go, you will follow the graph from the bottom up, right to left, then left to right for the next row and so on. You don’t have to keep the back side very tidy as it will be hidden but make sure you are consistent.
- Panels and sides are worked in rows. Each row will end with a Ch 1 and turn. Chains do NOT count as stitches throughout.
- Gauge for this project is not important. You want to make sure that your stitches are consistent and even though so that you have a good base for your cross stitching and that your stuffing doesn’t show through. My pillow came out to be about 10” wide x 12” tall x 4” deep.
Panels
(Make 2)
In Black
1) FSC 35 OR Ch 36, starting in 2nd from hook, SC in each across. (35)
2-6) SC in each st across. (35)
Row 7 is when the color changing will start. You can use the graph at the bottom of this pattern to do the changing across or use the pattern written out as follows. #B indicates the number of stitches in Black, #G indicates the number of stitches in Green. You will still end with 35 SC on each row.
7) 1B, 1G, [7B, 1G] 4 times, 1B
8) [3G, 5B] 4 times, 3G
9) 4G, [3B, 5G] 3 times, 3B, 4G
10) 5G, [1B, 7G] 3 times, 1B, 5G
In Green
11-33) SC in each st across. (35)
34) SC, Skip next st, SC in next 31, Skip next st, SC in last. (33)
35) SC, Skip next st, SC in next 29, Skip next st, SC in last. (31)
36) SC, Skip next st, SC in next 27, Skip next st, SC in last. (29)
37) SC, Skip next st, SC in next 25, Skip next st, SC in last. (27)
38) SC, Skip next st, SC in next 23, Skip next st, SC in last. (25)
39) SC, Skip next st, SC in next 21, Skip next st, SC in last. (23)
40) SC, Skip next st, SC in next 19, Skip next st, SC in last. (21)
41) SC, Skip next st, SC in next 17, Skip next st, SC in last. (19)
42) SC, Skip next st, SC in next, Skip next st, SC in next 11, Skip next st, SC in next, Skip next st, SC in last. (15)
43) SC, Skip next st, SC in next, Skip next st, SC in next 7, Skip next st, SC in next, Skip next st, SC in last. (11)
Finish off.


Sides
Your two Panels should look the same at this point (unless you crocheted the entire graph as you went). You’re going to do a SC border around Panel 1 and then finish off and cross stitch the remaining graph. Panel 2 will have the sides crocheted on and then you’ll attach to Panel 1.
For this part you’ll want to change colors so that the sides match the front of the Panels. For Panel 1 you will only do one round. For Panel 2, you will repeat the SC side row/round 9 times. Your black and green edges will be stitched together at the end.
The count for your edging doesn’t have to be exact but you should be placing about one stitch per row and one per stitch across the top and bottom. That should be about 47 in Black and 81 in Green. If yours is off by a little don’t worry as long as you’ve kept the spacing even. Just carry this number through your edging and repeat on the other panel.
Join Black yarn to the last black row on the right side (with the panel upright, so hair on top) Ch 1, SC evenly around the edges, Place an extra SC in each of the corners. Stop when you get to the last black row. For Panel 1, finish off. For Panel 2, Ch 1 and turn. Repeat until you have 9 rows. You can either finish off Panel 2 at this point, leave your yarn attached while you do the green side, or go ahead and SC to the front panel.
Join Green yarn to the first green row on the right side (with the panel upside down, so hair on bottom) Ch 1, SC evenly around the edges. Stop when you get to the last green row. For Panel 1, finish off. For Panel 2, Ch 1 and turn. Repeat until you have 9 rows. Continuing from here you will join the sides to the front panel.
I chose to join panels with a SC round going through both sides. You want the “right side” of your SC joining round to be facing the face of your monster so when you put your pieces together you will be going through the single panel first and then through the sides.
Continuing from Round 9 of the side, Ch 1, Insert hook through the first green or black (depending on which section you’re joining) on the front panel and through the first stitch of your side round, work a SC through both layers at the same time. Continue around the side to complete that color section. Finish off, leave a long tail in either color to sew the gap shut after stuffing. Repeat for the other color. You will have 2 openings on the sides where the green and black meet but haven’t been joined yet. Use this space to stuff your pillow as firmly as you like. The more you stuff it the rounder the pillow will get. You want to give it enough filling that the shape holds but not so much that it becomes distorted. Once your pillow is stuffed, use a tail to sew the openings on either side shut.
Optional Detail
You can add some suture lines anywhere you would like on your monster’s face (or even back of the head) by using some grey or black yarn and sewing them on. These can be just about anywhere or any size, your call.
Graph
Below you will find the graphed design for your Monster’s face! If you would like even more choices for designs you can check out the ad-free PDF download, there are 3 different faces PLUS a blank graph where you could create your own too!
If you need help with the cross stitch process you can check out my post on it HERE. You will also get all the cross stitch help included with the Ad-Free PDF version of the pattern which is available on Ravelry or ETSY.
To cross stitch your design, you will simply follow the pattern as written above for the front panel and then using a needle and length of yarn (you want a pretty long piece so you don’t have to tie off and restart so many times but also you don’t want it to be so long that you end up with tangles) you will count over and down to the appropriate place on the graph to start. I suggest starting at the top left corner and working left to right and top to bottom.
The graph is upside down because you will be starting from the top of the head and going down but moving up the graph in this way makes more sense.
KEY
– Black
– Forest Green
– White
– These are NOT part of your design. These are unused boxes of the graph.

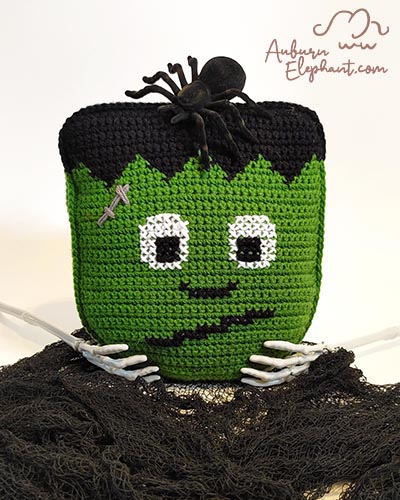
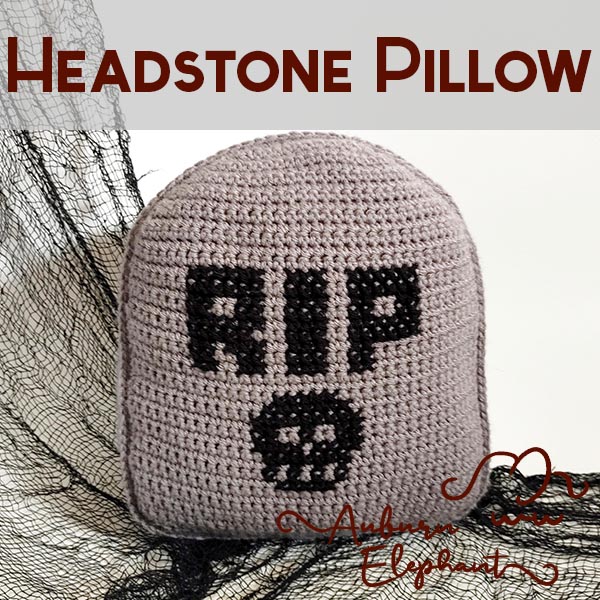
And there you go! A plush Monster pillow that’s not too spooky but still fits the season. If you would like to add more to your décor options check out the rest of the Spooky Halloween Pillow set!
cute but EXTREMELY HARD TO SEE PRINT!! :'( could you please use a black (looks like grey now) on all the words, not just the BOLDED words!? or use a thicker font?
thank you!
Hi! I’m sorry that the font is hard to read. 🙁 I do think the main text is grey. It looks darker on my mobile devices than it does from my computer though. The font and color are set with the site’s ‘theme’ so I’ll have to look into if/how I can change it. I appreciate the feedback! Thanks! 🙂
Thank you! yes all I have.is mobile!. not really sure what. You’ve said… Can’t read it lol!.but thanks!