This post may contain affiliate links. If you use these links to buy something I may earn a small commission at no cost to you. Thanks.
…
Guardians of the Galaxy has quickly become one of my favorite hero groups. Although, I am bummed to admit that I didn’t know anything about them until the movie came out. But since I’m basically in love with Chris Pratt I knew I would love Star Lord and his crew. Of course, I do also have a soft spot for Vin Diesel (I may have started a mini fan club in high school, nbd).
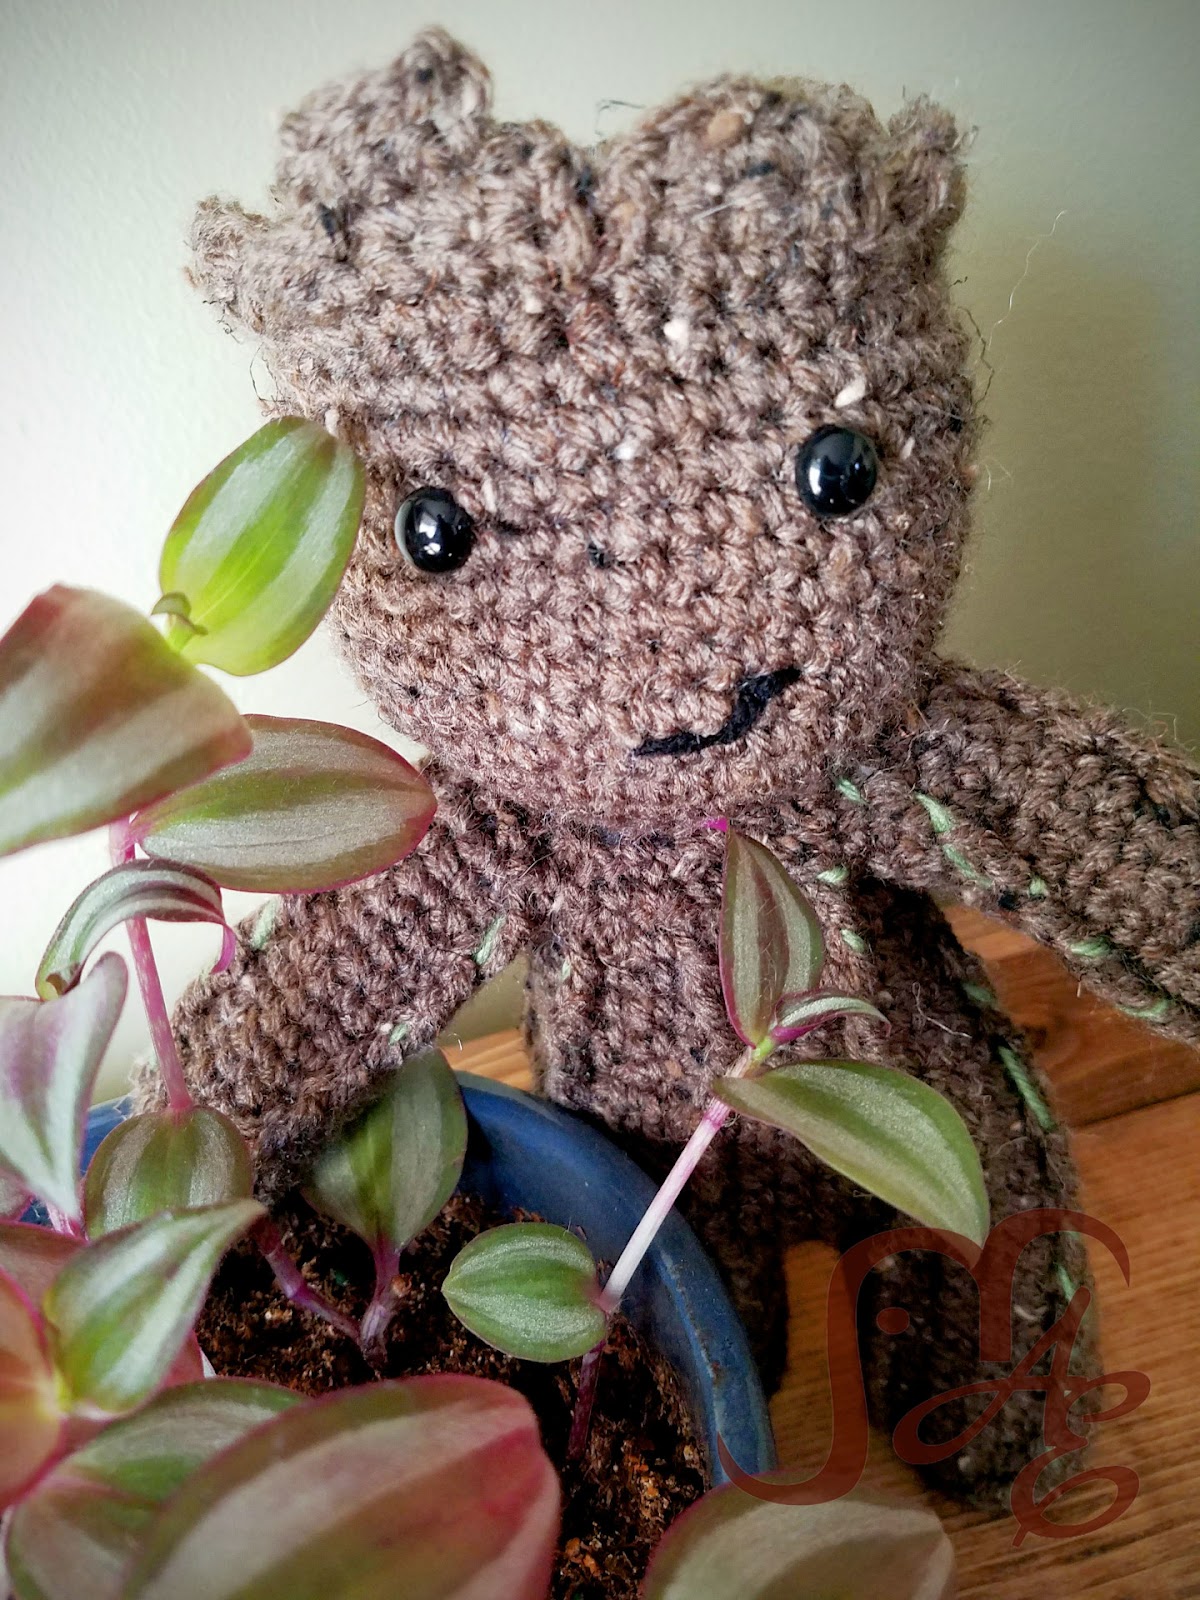
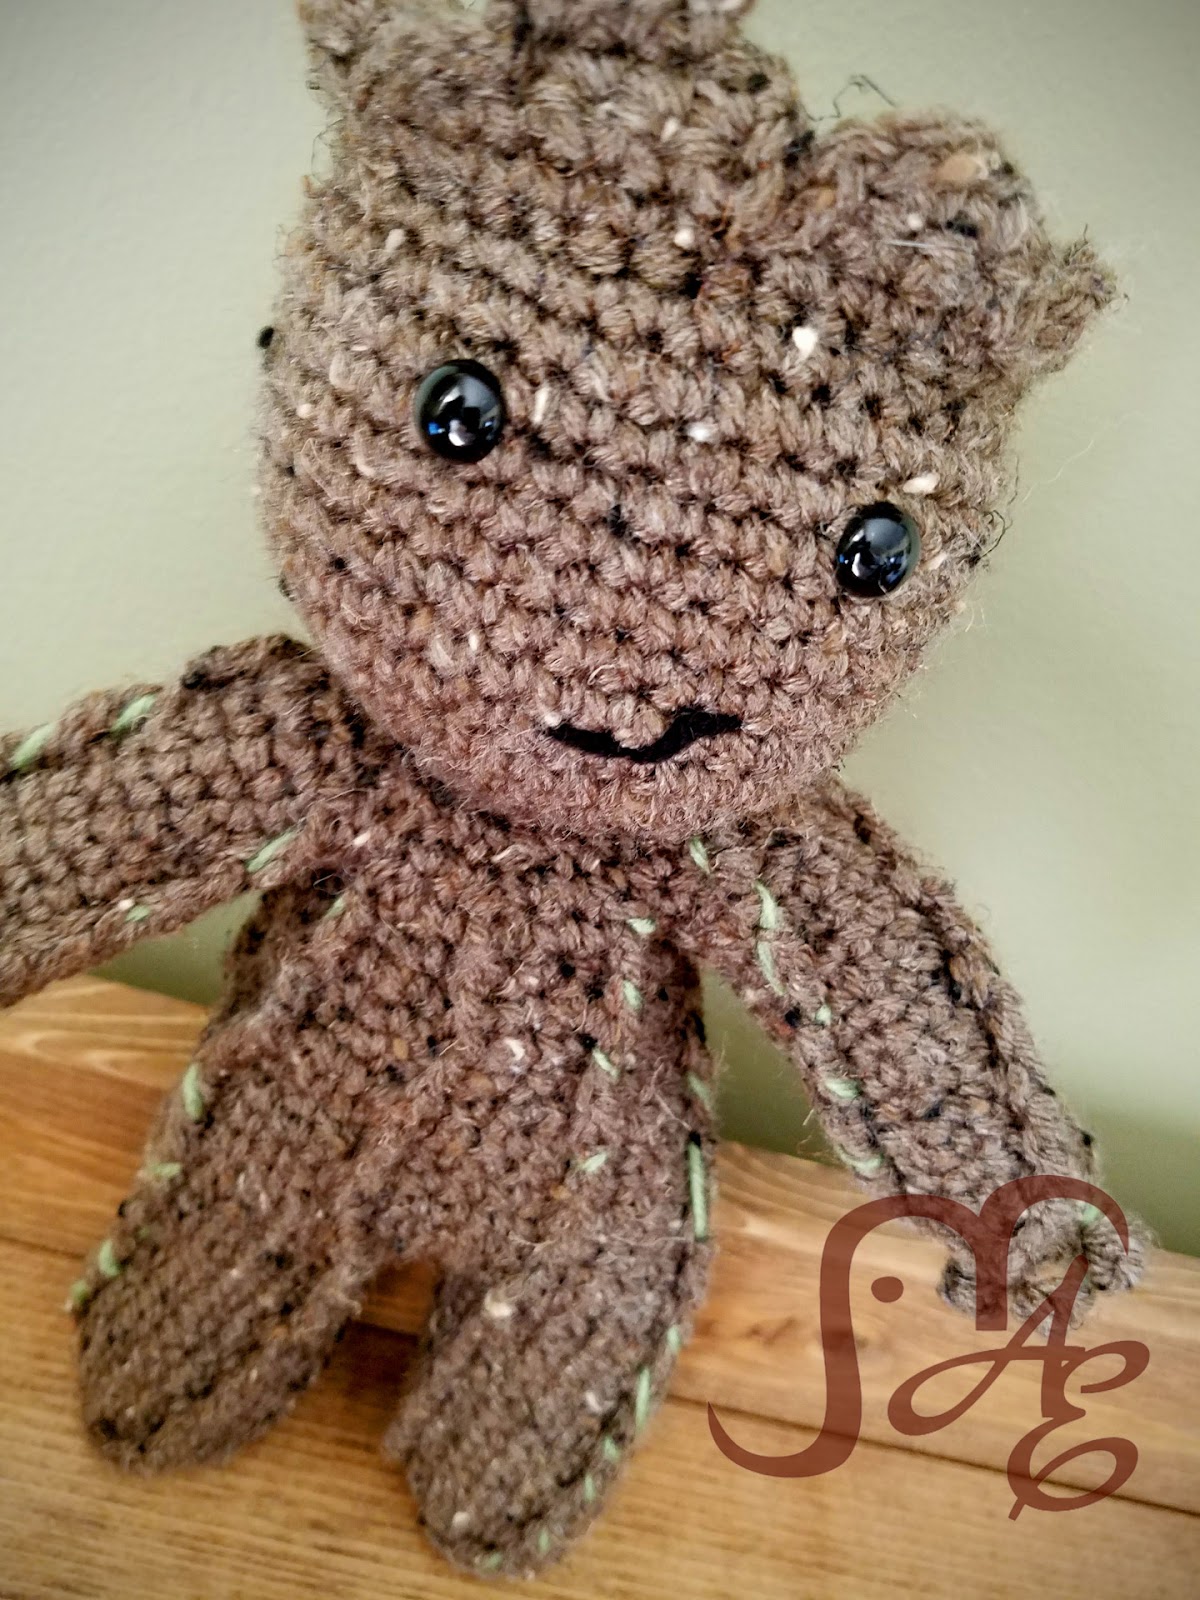
Anyway! Groot definitely stole the show for lots of people and I was asked to make this super adorable potted baby Groot several times. He was a hit and a lot of fun to make. I wanted to make a different version of him though. More like from the second movie. I’m calling him “Toddler Groot” because he’s not the baby in the pot any more and he has trouble following directions and controlling his temper, but is still super adorable! 😉
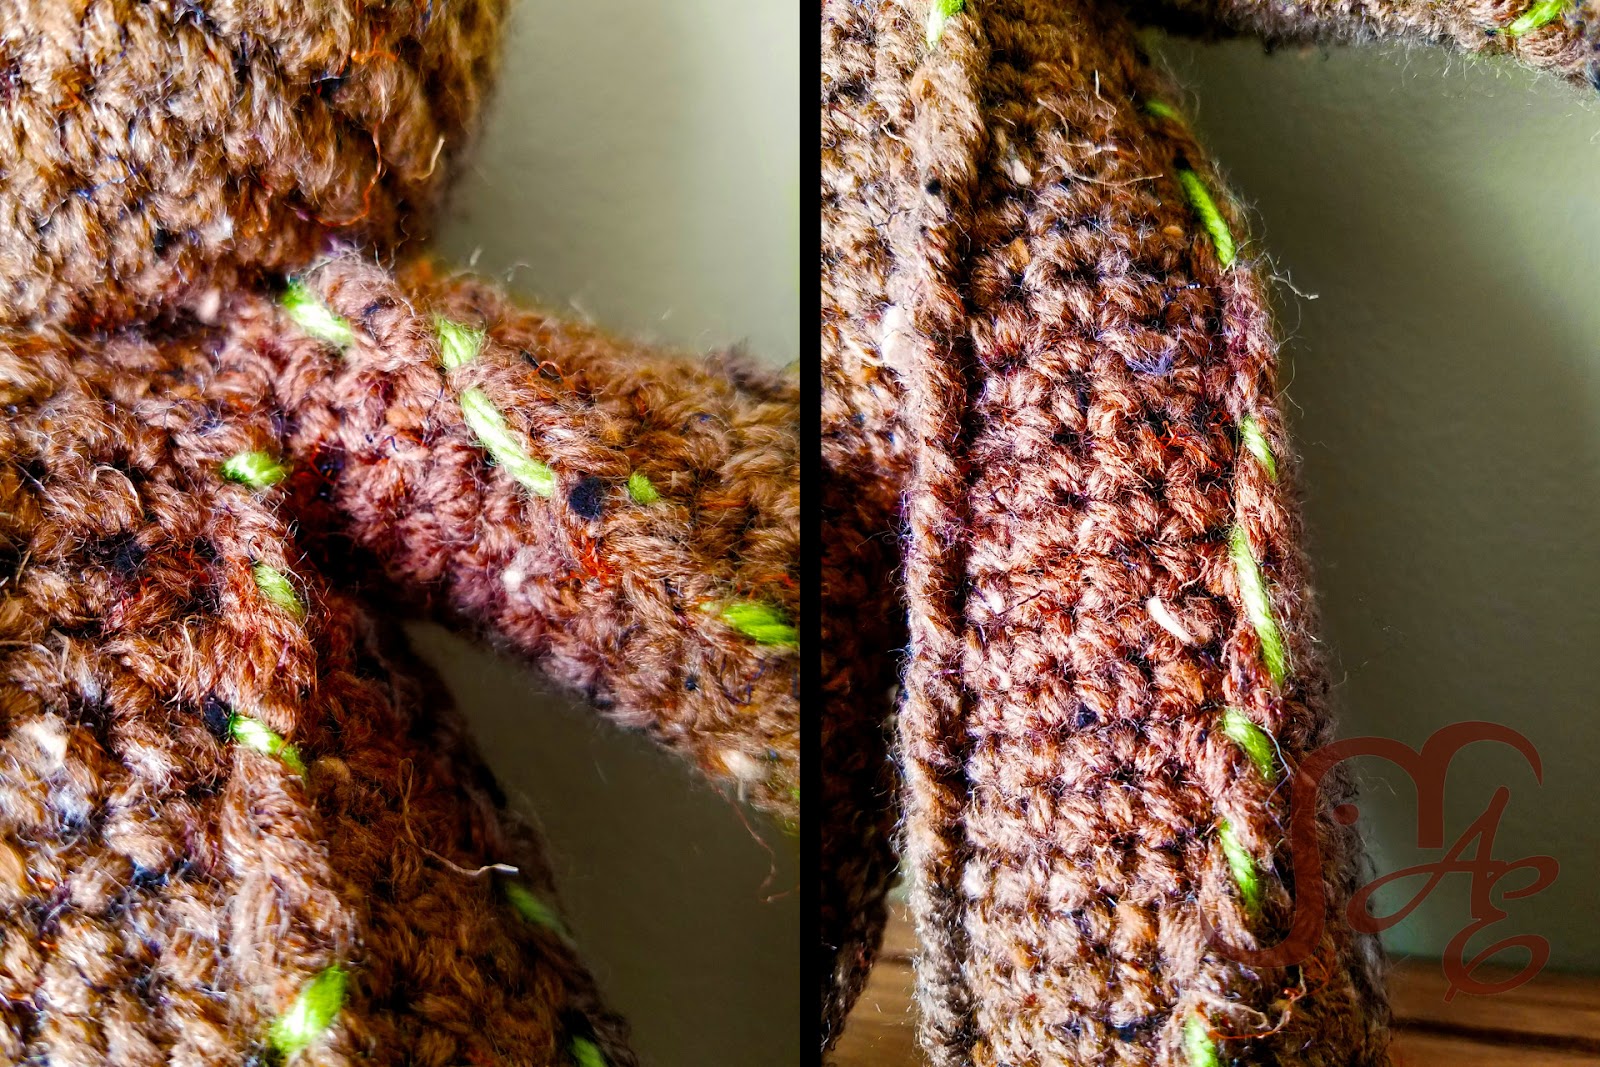
One thing I didn’t like about the potted Groot pattern was the sewing on the chain to make his “vines”. There’s nothing wrong with that it’s just I dislike sewing things together. I tried to come up with a different way to make the viney parts without having to do that. I used a Front Post Triple Crochet (FPTC) to achieve the look. I’m pretty impressed and proud of the outcome. I hope that I’m able to explain it well enough for other people to understand. But, basically, you’ll be doing the FPTC in intervals around every few rounds (for the sake of ease in the pattern I put mine evenly spaced, if you’d rather them be more random you should be able to adjust easily). I also start the vines all at the bottom, again for ease and clarification of writing, you could also stagger their starts, you’ll just have to make sure to account for that in the other rounds.

Toddler Groot
Supplies Used:
Vanna’s Choice, Medium Worsted Weight 4 (100% Acrylic, 145 yds, 3 oz) Barley, 1 skein
G/6 4.25mm Hook
Small amount of black yarn for mouth, small amount of green for leaves/vines if desired
Tapestry Needle
PolyFil
Safety Eyes (2) 8-12mm
Stitches Used: (US Terms)
Ch- Chain
Sl st- Slip Stitch
SC- Single Crochet
Special Stitches:
BPSC- Back Post Single Crochet
FPTC- Front Post Triple Crochet- Yarn Over twice, Insert hook from front to back then back to front around the post of the designated stitch, Yarn Over, Pull Through, Yarn Over, Pull Through 2 loops, Yarn Over, Pull Through 2 loops, Yarn Over, Pull through Remaining 2 loops.
Bobble- Bobble Stitch- Yarn over, insert into next stitch, yarn over, pull through, yarn over, pull through 2 loops, *yarn over, insert hook into the same stitch, yarn over, pull through, yarn over, pull through 2 loops* Repeat from * to * until you have 5 loops on your hook, yarn over pull through all loops.
DEC- SC Decrease, Using the Invisible Decrease method, insert hook up through the front loops of the next 2 stitches, yarn over, pull through front loops, yarn over, pull through all loops to finish decrease.
SC3TOG
Notes:
- Unless noted, you’ll work in continuous rounds, use stitch marker or scrap piece of yarn. (I actually use the tail from my starting Magic Ring)
- The FPTC stitches will basically not count toward the round totals. So on the arms for example, there are 10 SC around. When you do the FPTC round, you will end with 10 SC and 3 FPTC. The next round you’ll skip the FPTC so you will still end with the 10 SC.
- On the first FPTC rounds, you’ll notice I say use the post of the stitch that is 2 forward and 2 rows down. This puts the vine at a bit of an angle. You can choose to start yours more over or less. It will just change the angle of the vines.
- The first SC after one of the FPTC will go into the stitch that is behind the FPTC, the next SC in the round. You want the round to end with the same number of SC stitches as you started with. (Unless there’s a decrease in the round.)
- Feel free to make this guy your own way. If you don’t love doing the FPTC (or I confused you with the directions) you could always leave them out entirely and add vines on later using the chain and sew method.
Arms (Make 2)
1) Using the Magic Ring technique (OR Ch 3 and join with a sl st to the first ch to form a ring) SC 5 (5)
2) 2SC in first, *(Bobble, SC) in next* Repeat from * to * 3 more times (4 Bobbles, 6 SC) be sure to push bobbles out towards you.
3-4) SC in each around (10)
5) *SC 3, FPTC around the post that is 2 rows down and 2 stitches forward.* Repeat from * to * around. SC in last. (3 FPTC, 10 SC)
6) *SC 3, Skip FPTC* Repeat from * to * around. SC in last. (10 SC)
7) SC in each around. (10)
8) *SC 3, FPTC around the FPTC of round 5.* Repeat from * to *. (3 FPTC, 10 SC)
9-10) Repeat rounds 6-7
11-13) Repeat rounds 8-10
14-16) Repeat rounds 8-10
17-19) Repeat rounds 8-10
Finish off. Stuff.
Legs (Make 2)
1) Using the Magic Ring technique (OR Ch 3 and join with a sl st to the first ch to form a ring) SC 8 (8)
2) 2SC in each stitch around (16)
3) BPSC around (16)
4) SC in each around (16)
5) SC 2, FPTC around the post that is 2 rows down and 2 stitches forward. *SC 4, FPTC around post 2 rows down and 2 stitches forward* Repeat from * to * around, SC in last 2 stitches. (16 SC, 4 FPTC)
6) SC 2, Skip FPTC, *SC 4, Skip FPTC* Repeat from * to *. SC in last 2 stitches. (16 SC)
7) SC in each around. (16)
8) SC 2, FPTC around the FPTC of round 5. *SC 4, FPTC around the next FPTC of Round 5.* Repeat from * to * around. SC in last 2. (16 SC, 4 FPTC)
9-10) Repeat Rounds 6-7
11-13) Repeat rounds 8-10
14-16) Repeat Rounds 8-10
17) Repeat Round 8
18) Repeat Round 6
Finish off 1st Leg. Stuff. Don’t finish off 2nd leg (that’s where we’ll start the body). Stuff.
Body
Continuing off of the second leg, SC 2, Ch 1, turn, SC 4, Ch 1, turn, SC 4, Sl st to other leg.
From there-
1) SC around outside of legs (30)
2) SC 3, FPTC around the FPTC on the leg. *SC 4, FPTC around the FPTC on the leg* Repeat from * to *, SC in last 3 (one FPTC from leg will be unworked) (30 SC, 7 FPTC)
3) SC 3, *Skip FPTC, SC 4* Repeat from * to * around, SC in last 3. (30)
4) SC 5, DEC, SC 13, DEC, SC 8 (28)
5) SC 2, FPTC around previous FPTC (from here on out), SC 4, FPTC, SC 5, FPTC, SC 4, FPTC, SC 5, FPTC, SC 2, FPTC, SC 4, FPTC, SC 3. (28 SC, 7 FPTC)
6) SC in each SC around, skipping FPTC. (28)
7) SC 10, DEC, SC 6, DEC, SC 8. (26)
8) SC 2, FPTC, SC 2, DEC, SC, FPTC, SC 3, FPTC, SC 4, FPTC, SC 2, FPTC, SC 4, FPTC, SC 2, DEC, FPTC, SC in last. (24 SC, 7 FPTC)
9) SC in each SC around, skipping FPTC. (24)
10) SC, DEC, SC 6, DEC, SC 2, DEC, SC 6, DEC, SC. (20)
11) SC 2, FPTC, SC 3, FPTC, SC 3, FPTC, SC 2, FPTC, SC 3, FPTC, SC 4, FPTC, SC 2, FPTC, SC in last. (20 SC, 7 FPTC)
12) SC in each SC around, skipping FPTC. (20)
(You’ll be attaching the arms in the next round so get them ready.)
13) SC 4, Sl st 3 through the inside of the arm, SC 7, Sl st 3 through inside of arm, SC 3 (14 SC, 6 Sl st)
Now you’re going around the outside of the arms.
14) SC 2, FPTC, SC 2, SC in the joining SS, FPTC, SC 3, FPTC, SC 2, FPTC, SC 3, FPTC, SC 3, FPTC, SC 2, FPTC, SC 3, FPTC, SC 2, FPTC, SC 4, FPTC, SC in last (28 SC, 10 FPTC)
15) *SC 4, DEC (Skip over FPTC throughout the round)* Repeat from * to * around. SC in last 4. (24)
16) DEC around. (12)
17) SC in each around. (12)
Starting Head
18) 2SC in each around. (24)
19) *SC, 2SC* Repeat from * to * around. (36)
20) *SC 5, 2SC* Repeat from * to * around. (42)
21-30) SC in each around. (42)
31) BPSC around, join with Sl st to first BPSC, Sl st back to the top first SC of Round 30. (42)
Now you are working in the tops of the SC from Round 30 (the BPSC will be behind). These will be the little broken bits on the top of Groot’s head so each little section will be worked back and forth and then you’ll SS down the side to bring it back down to the round. You can follow the next round exactly or make your own.
32) SC 5, Ch 1, turn, SC 5 across, Ch 1, turn, SC 5 across, Ch 1, sl st down side back to the working round. Sl st into next stitch. SC 7, Ch 1, turn, SC 7, Ch 1, turn, DEC, SC 3, DEC, Ch1, turn, DEC, SC, DEC, Ch1, turn, SC3TOG, Ch 1, Sl st down the side back to the working round. Sl st into next stitch. SC 6, Ch 1, turn, DEC, SC 2, DEC, Ch 1, turn, SC 4, Ch1, Sl st down side back to working round. Sl st into next stitch. SC 4, Ch 1, turn, SC 4, Ch 1, turn, SC 4, Ch 1, Sl st down side back to working round. Sl st into next stitch. SC 6, Ch 1, turn, SC 6, Ch 1, turn, SC 4, Ch 1, turn, SC 3, Ch 1, turn, Sl st 3, Sl st down side back to working round. Sl st into next stitch. SC 4, Ch 1, turn, SC 4, Ch 1, turn, SC 4, Ch 1, Sl st down side back to working round. Sl st into next stitch. SC 4, Ch 1, turn, SC 4, Ch 1, turn, SC 2, Ch 1, turn, Sl st 2, Sl st down side back to working round. Sl st into starting space.
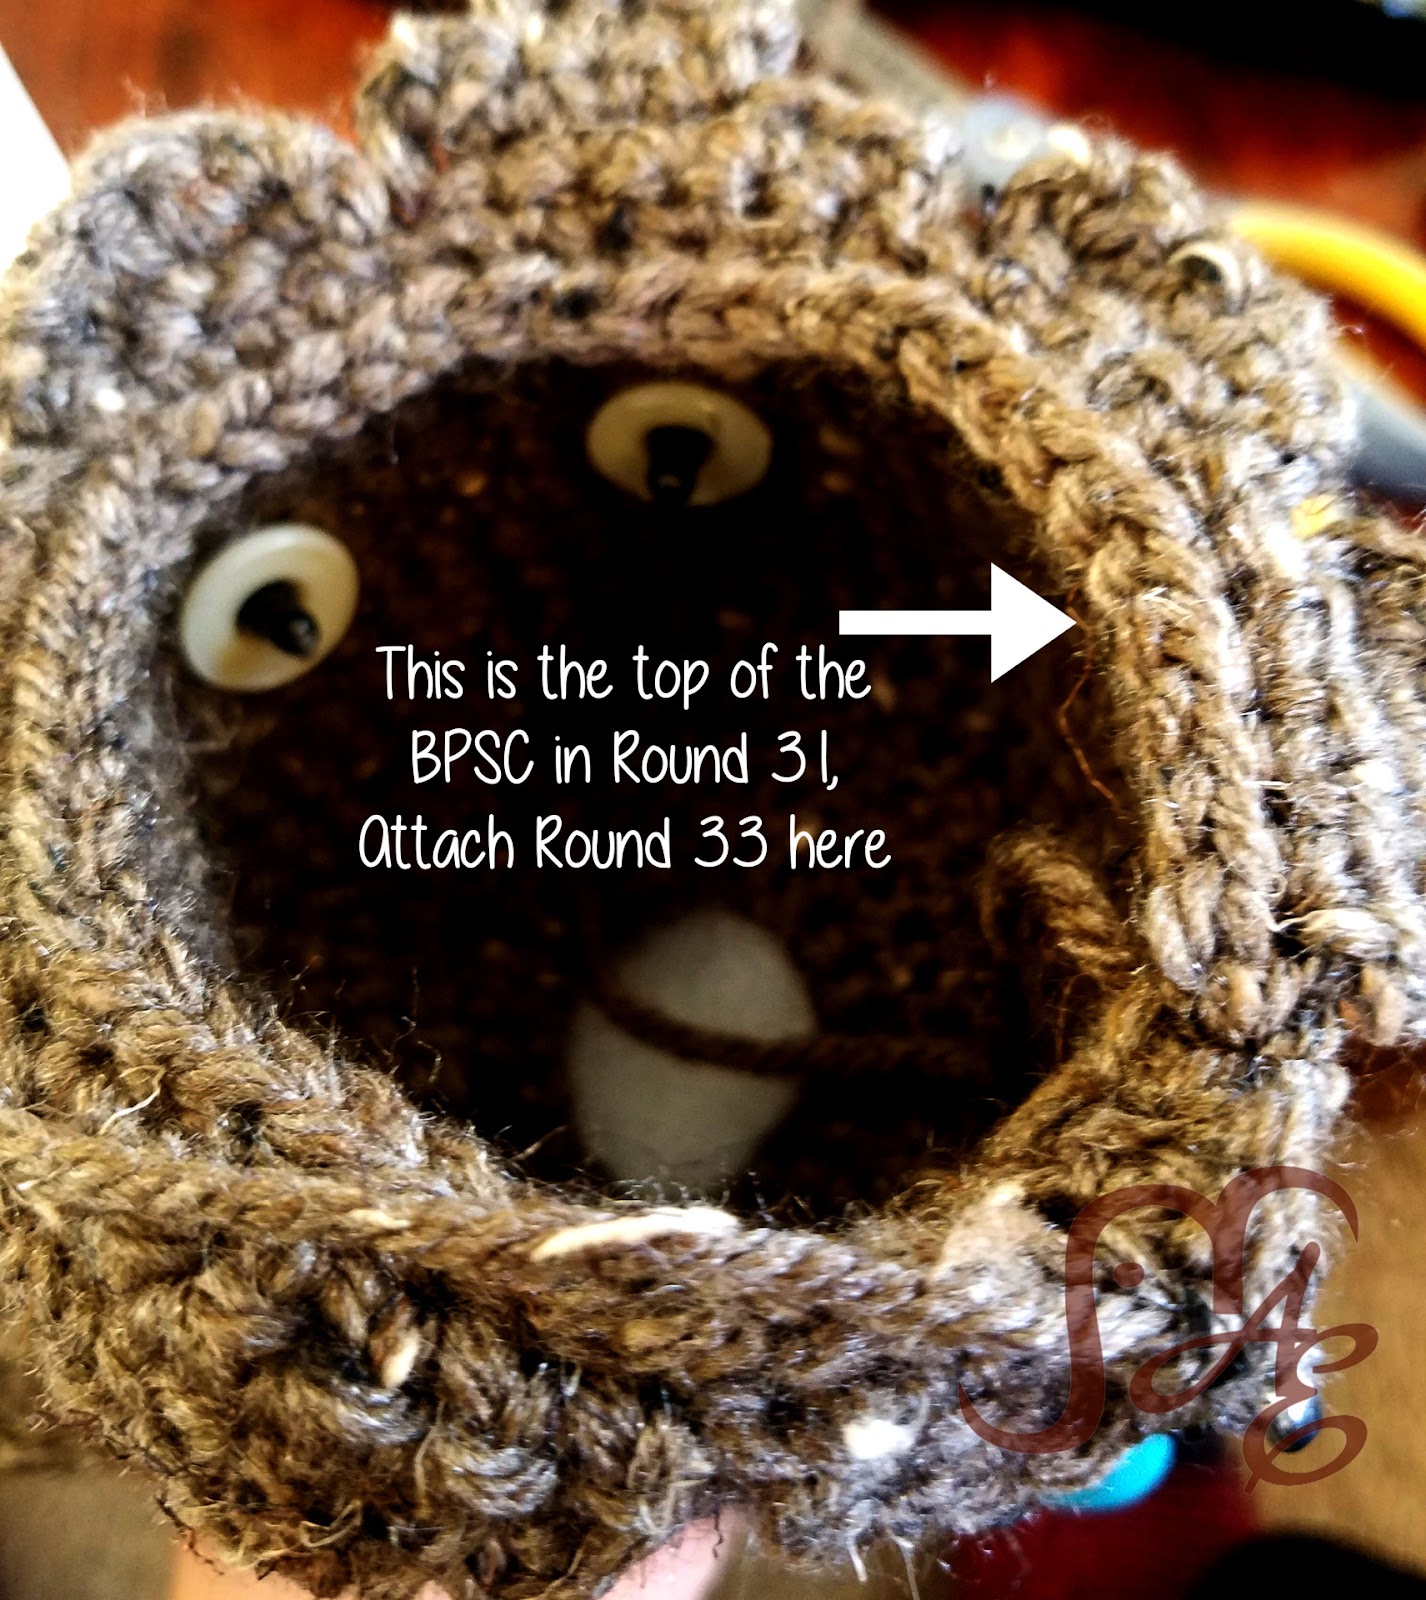
From here you can either Finish off and reattach the yarn to the top of the BPSC in Round 31 that should be facing the inside of Groot’s head. OR you can just Sl st from the end of Round 32 back to the tops of the BPSC.
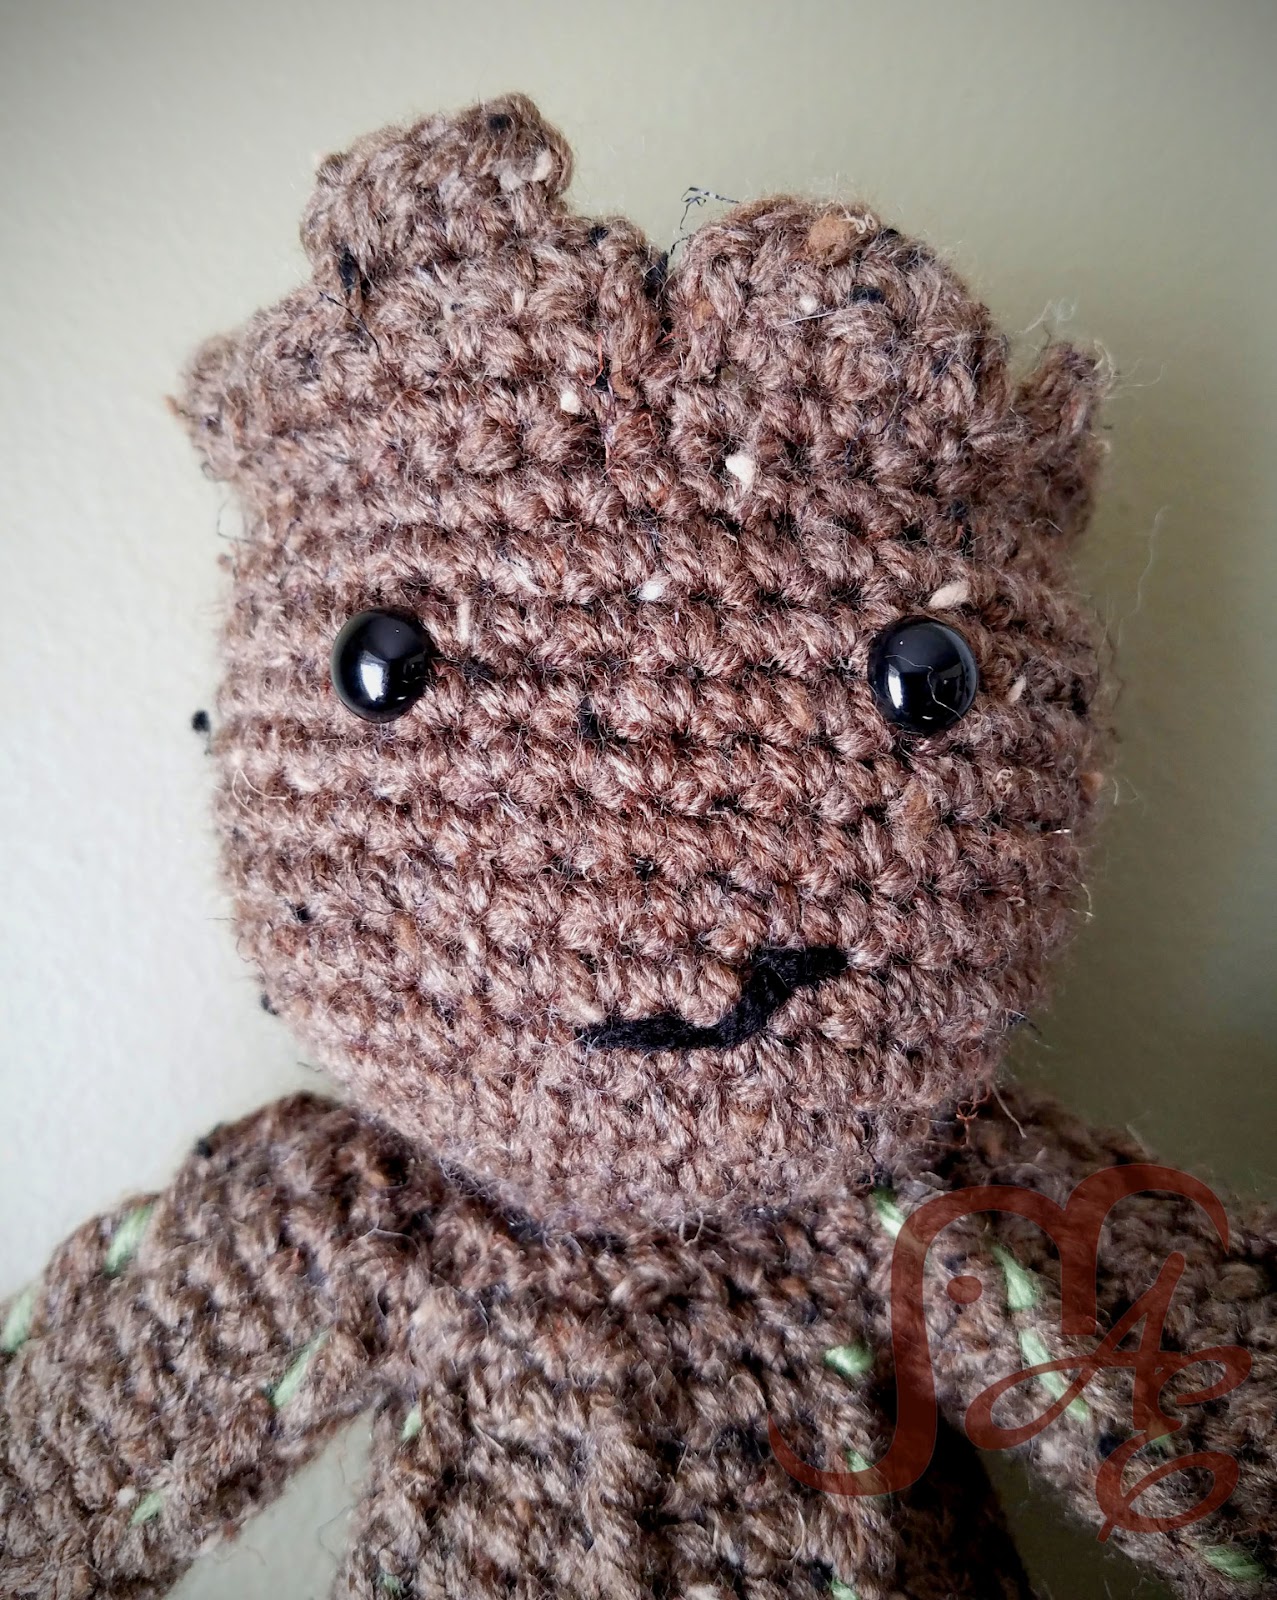
Before starting the top, you should place the eyes. I put mine between Rounds 27 and 28 about 7 stitches apart. You can adjust for your own liking. I used 10mm safety eyes but I think it would be cute with bigger or smaller. Your call.
Top of head
(Remaining rounds will be joined. Start each with a Ch 1, and finish with a sl st to the first SC of the round.)
33) *SC 5, DEC* Repeat from * to * around. (36)
34) *SC 4, DEC* Repeat from * to * around. (30)
35) *SC 2, DEC* Repeat from * to * around. (20)
36) *SC, DEC* Repeat from * to * around. SC in last 2. (14)
Stuff.
37) DEC around. (7)
Finish off, leave long enough tail to sew hole shut.
Use a small length of black yarn to embroider a mouth.
If you want to add the little bit of green in his vines, you can take a long strip of green on your needle and wrap it around and through the FPTC. I did this on only a few of the vines so it didn’t look too consistent. You could do more or less. You could also add little leaves if you prefer. Just Ch 3, SC in 2nd from hook, SC in next, Finish off and sew in place. You could do as many of those as you want. Or even a combination of both.