This post may contain affiliate links. If you use these links to buy something I may earn a small commission at no cost to you. Thanks.
…
I went in to Michael’s one day to look for a skein of Caron Big Cakes so I could make a specific pattern that I saw on Facebook and just loved! I don’t usually go to Michael’s because the one closest to me is not as easy to get to and they have a fairly small yarn section. But that’s the only place to buy the Big Cakes and I happened to be near one while I was out and about one day so I decided to stop in.
And Oh Man! I’m so glad that I did! They had SOOO much of the Caron Big Cakes on CLEARANCE! It was amazing. I hadn’t grabbed a basket or cart or anything (since I was only intending to buy the 1 skein…) I quickly realized my mistake and grabbed a cart. I ended up leaving with 10 skeins plus a giant hook that was also marked down.
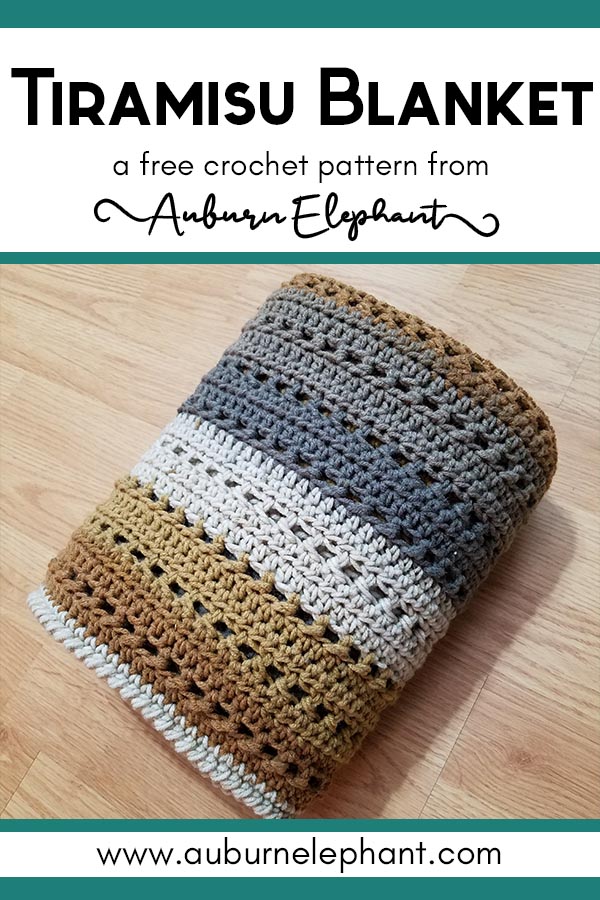
I had never caught these on clearance before but I know that they do that to clear out seasonal colorways. So I knew that I would need to get several skeins of a color just in case the project I used it for needed more. I grabbed 4 of this Tiramisu color. I thought it looked so warm and inviting! I had been wanting to work up a new blanket pattern for a while so it was perfect!
Now that I had the yarn though I could not think of a new fun pattern to do. I hit a wall and kept putting it off. Then I remembered that a couple of summers ago I found this old school Crochet Project book at a yard sale for like $1. It’s from at least the early 80’s if not before. Even though a lot of the projects and photos are terribly dated some of the techniques and stitches are still usable. I flipped through that one night and found this HDC post stitch. It was used for a small bag, and called for a thinner cotton yarn. So I modified it and came up with this pattern. I love Post stitches and the texture and designs that come out of them. I love the way this came out. I definitely have a few other ideas on how to use it as well. I’m looking forward to those! 🙂
I hope you enjoy this crochet pattern and that I’ve made it easy enough to follow. If you have any questions you can send me an email OR through the contact page. I’d also love to see your finished creations! Connect with me on Facebook or Instagram- @AuburnElephant!
A couple of disclaimers: This pattern is intended for personal use only. You are welcome to use the pattern to make and sell products, to keep for yourself, or to give away as gifts. I would appreciate receiving credit and a link back to the site. Please do not republish or distribute the pattern in any way, or use my photos in your listings.
UPDATE, 3/2021: I have finally gotten around to updating this pattern with some new photos explaining the special stitch as well as a video guide! I hope it is helpful. 🙂
Tiramisu Blanket
Supplies Needed:
- Caron Big Cakes, Medium Worsted Weight 4 (100% Acrylic, 603 yds, 10.5 oz) Tiramisu, 2 skeins, approximately 1200 yds
- 1 Coordinating color (for the border, optional. You can also just use one of the cake colors)
- I/9 5.5mm Hook
- Tapestry Needle
Stitches/Terms Used (US):
- Ch- Chain
- Sl st- slip stitch
- FHDC- Foundation Half Double Crochet
- HDC- Half Double Crochet
- Post- The tall middle part of a stitch
- SC- Single Crochet
- Crab Stitch- For the border, optional.
Notes:
Gauge isn’t terribly important. To come out as I made it, the gauge would be 5 rows of 10 HDC=approx 3.25” x 2.25”. My finished size was approximately 32” x 38”.
If you would like your blanket to be larger or smaller, you can go up or down a hook size. OR add or subtract from the starting row. Just be sure to end on an odd number. Also note that will mean your stitch counts will change throughout.
Keep in mind though if you change the starting length your Caron Big Cakes may not stripe in the same way mine did and you may need more than 2 skeins if you increase the size very much.
Blanket
1) Begin with a FHDC 101 OR Ch 103, starting in 3rd chain from hook, HDC 101. Ch 2, turn. (turning chains do not count as a stitch.) (101)
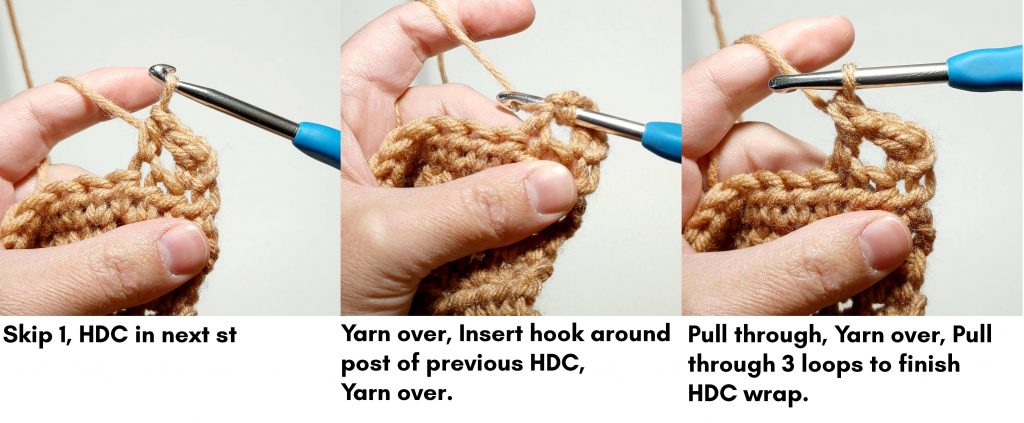
2) HDC in first, HDC around the post of the previous HDC, Skip 1, *HDC in next, HDC around post of the previous stitch, Skip 1;* Repeat from * to * across. HDC in last stitch. Ch 2, turn. (You should end up with 50 HDC “wraps” plus one HDC at the end)
Check out the photo and video tutorials below.

3) HDC in each stitch across. Ch 2, turn. (101)
4) HDC in each stitch across. Ch 2, turn. (101)
5-85) Repeat Rows 2-4.
86-87) Repeat Rows 2-3 (Add or subtract rows to adjust the length of your blanket.)
Border
I pulled out some of my remaining cake’s yarn to find the lighter color for the border. You can also just continue with whichever color you are on OR join a coordinating color from a different skein.
1) SC evenly around the edges of the blanket. Sl st to join to first SC.
2) Use a Crab stitch to go around again and finish off.
I chose the Crab stitch because I love the twisty texture and I thought I worked well with the HDC post rows. You can find lots of tutorials online for it if you are unfamiliar (I don’t have one of my own yet). OR you can choose another border option or simply leave the one SC round. It’s up to you! 🙂


Hi there! I love this pattern and the blanket looks amazing! I recently bought a skein of the big cakes and have been contemplating what to do with it. How did you make sure the rows of colors were all the exact same size. In my experience with the Caron Cotton Cakes, the colors just transitioned and the rows were uneven (color wise). It wasn’t a huge deal for the bag I made, but I’ve been hesitant to use yarn like this for a blanket for that reason. I hope that made sense! Thanks for sharing this pattern!!!
Hi! I’m so glad you like this pattern! For this blanket I did my best to start with a width that made most of the colors end evenly, but they didn’t all change perfectly at the ends. I didn’t find it terribly distracting though. If it bothers you, the other option is to cut the colors when you get to the end of a section so that they change on the end. That’s just an extra step and knot though. I hope that helps! Thanks! 🙂
I know this is an older post but I have the same question.
Hi! Yeah, the color striping yarn can be kind of difficult. I had better luck with these cakes than I have had with others. The only way to really guarantee that the stripes will end up the exact same is to pull out each color and measure. But that sounds terrible. My suggestion is to start with a full color, so pull out the starting color and trim it off (save it for later though just in case) and then start crocheting. When you get to the next color, trim that so that the changes happen at the end of a row and base your other changes from that first one. I found that the sections stayed pretty even after the first couple of sections. Hopefully you have good luck with it!
Wow! You did such a great job! I absolutely love those colors and the stitch patters you chose. I just went and ordered the 2 balls of the tiramisu. I can’t wait to get started. Thanks so much for sharing. 🙂
Silly question, but is it implied that when you are skipping a post that you have chained one to allow for that skipped space?
Hi Michelle! Thanks for your question, I hope I’m understanding it correctly. No, you don’t need a chain to account for the skipped space. The HDC that goes around the post of the previous is what would have gone into the skipped space so a chain is not needed to keep it even. I hope that makes sense and helps!
Thanks!
Erin
Hi! Wondering about rows 3/4: on the end do I HDC into the top of the starting chain? Do I start rows in the same st as ch 2? And haha, should there be a sk1 between last HDC post and HDC on the end of row 2???
Hi Jessica! The turning chains do not count as stitches so you should not work into them. Yes, start rows in the same st as the starting ch 2. And yes, there is a skip 1 before the final HDC (the repeat ends at the skip 1). I hope that helps! Let me know if you have more questions. 🙂
Hi! Love the pattern.
If I dont work into the turning chain the edges are very uneven, but if I do there are extra stitches.
After the wrap row, when you are going back to HDC, can you explain what to do ?
Hi! I’m glad you like the pattern. Let’s see if I can help answer your questions. The first stitch of the row should go into the same as the turning chain, the turning chains do not count as stitches and you shouldn’t work into them. If the turning chains are causing a very uneven edge you can try doing the ch 2 tighter or a loose ch 1 instead. The first HDC row after the wrap row should be worked into the top of each HDC as you would a normal row. The video tutorial on this page, while made for a different use of the stitch, might help for a visual as well. I hope that makes sense. Let me know if you have any other questions! Thanks, Erin 🙂