This post may contain affiliate links. If you use these links to buy something I may earn a small commission at no cost to you. Thanks.
…
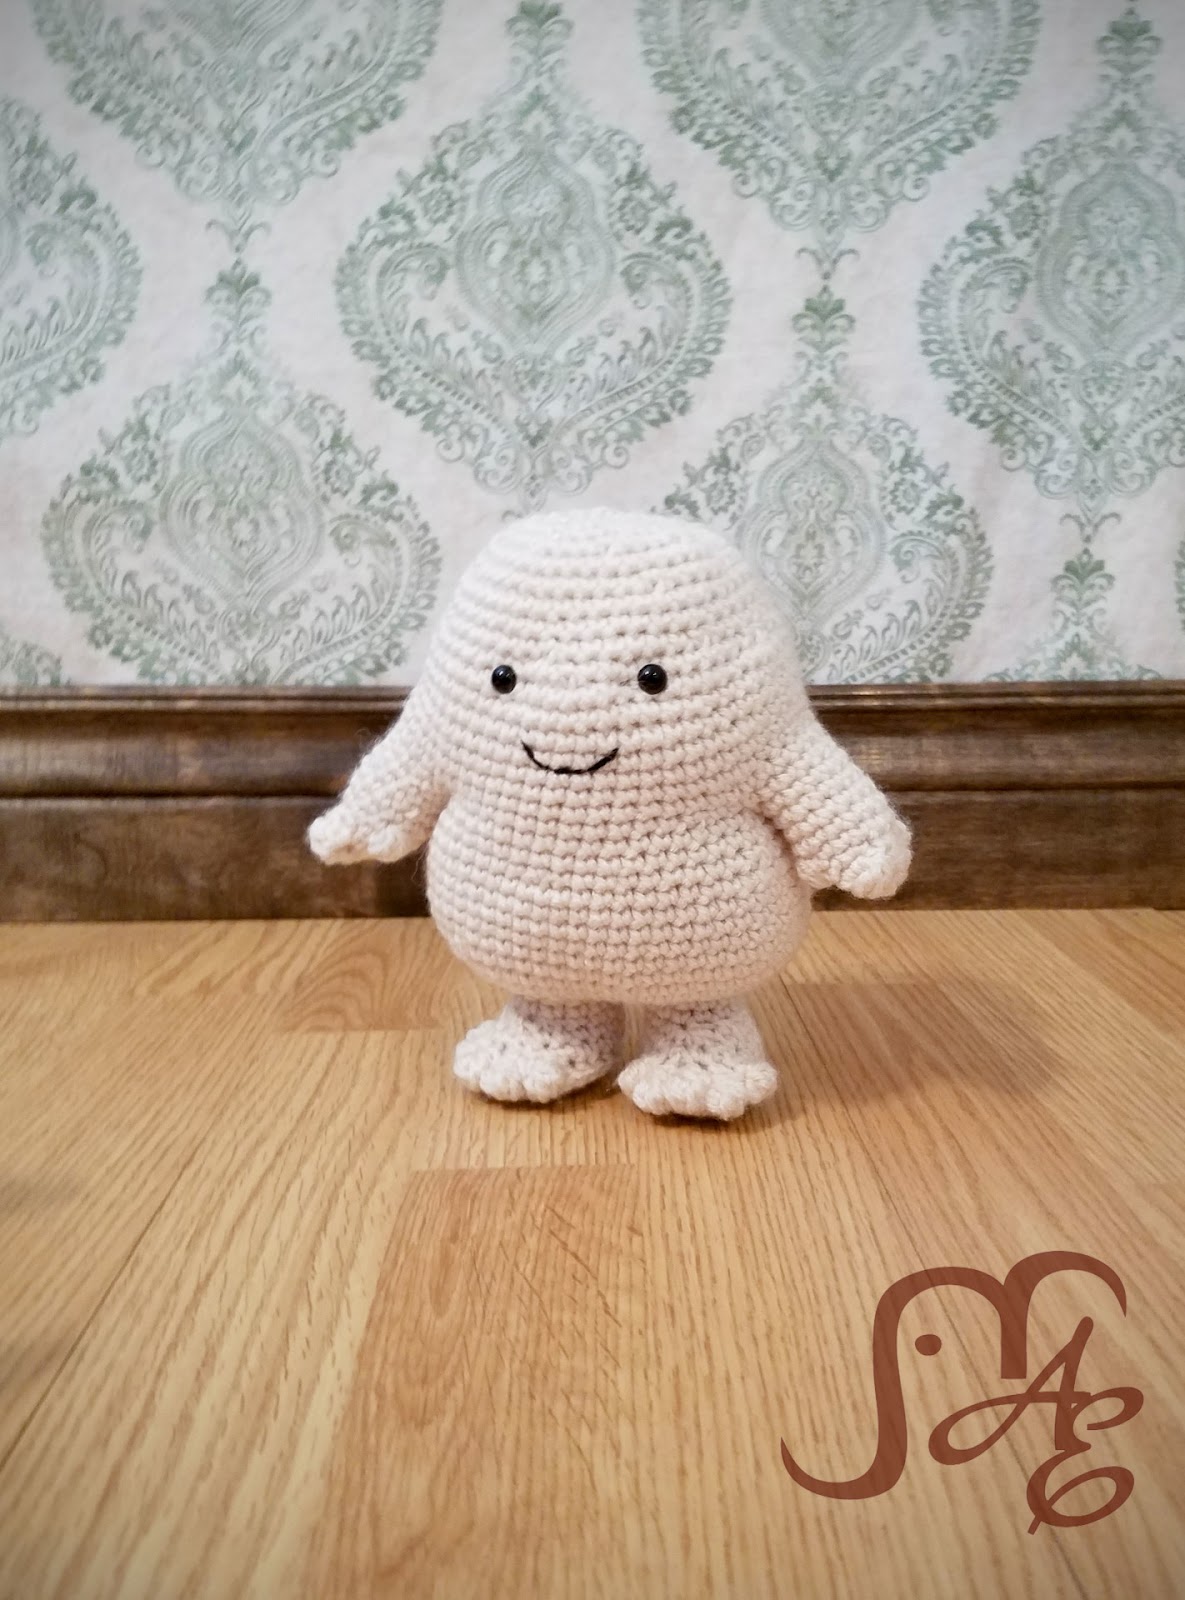
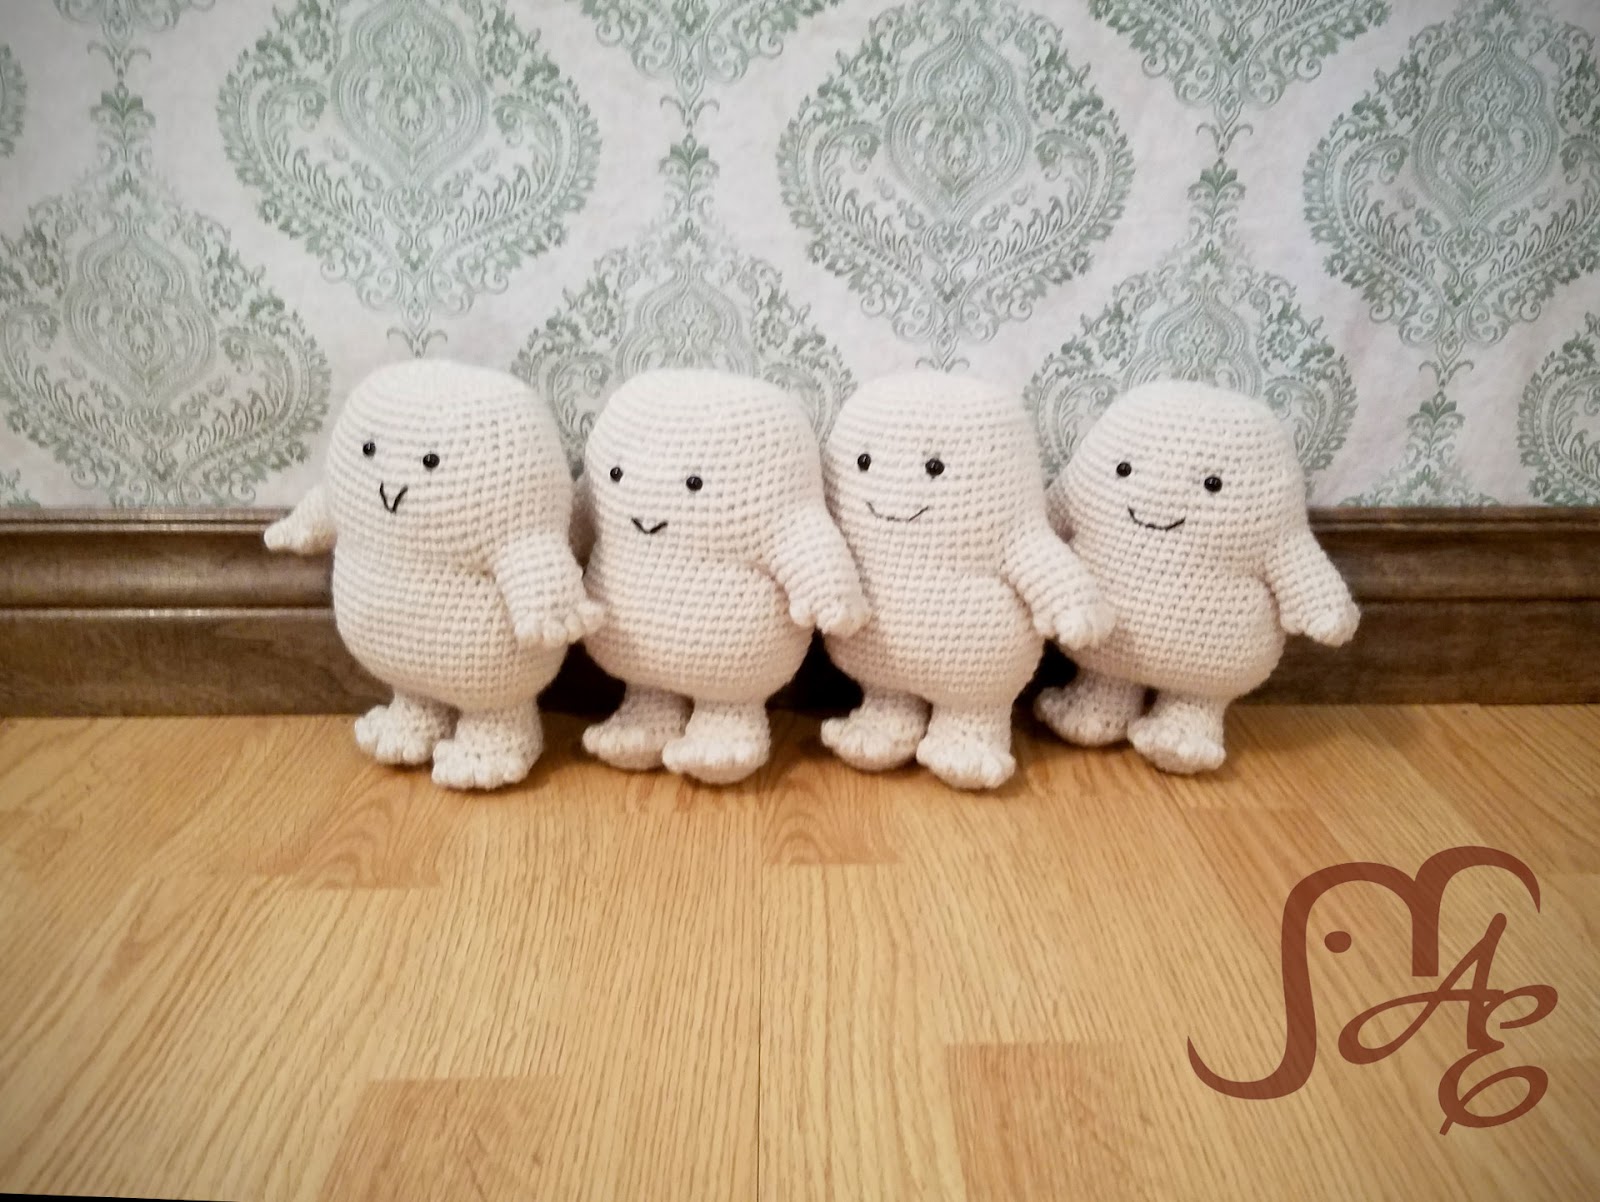
There are so many great characters in Doctor Who. The obvious ones, Daleks, Weeping Angels, Sontarans, the Silence, the Oods, are all pretty great but one of my favorites was always these little Fat Babies! You can’t even be mad at them for killing people because they are so darn cute and just babies so they didn’t really know what they were doing. And they did make people really happy before they killed them so they were at least being kind of considerate. It would be nice if every one of these that I made took a pound or two with them! Alas, that doesn’t work. But they are super cute and squishy! I’d love to see how your Adipose come out. 🙂
A couple of disclaimers: This pattern is intended for personal use only. You are welcome to use the pattern to make and sell products, to keep for yourself, or to give away as gifts. I would appreciate receiving credit and a link back to the site, however. Please do not republish or distribute the pattern in any way, or use my photos in your listings.
I am not a robot, so if you find any typos, errors, or places that need clarification, please let me know so that I can fix my mistakes or explain things differently. 🙂
I hope you enjoy this crochet pattern. If you have any questions or comments you can leave them below OR email me at auburnelephant@gmail.com OR through the contact page on this site. I’d also love to see your finished creations! 🙂

Adipose Plush
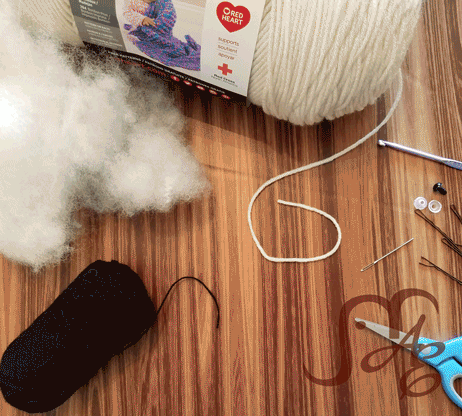
Supplies Needed:
Red Heart Super Saver, Medium Worsted Weight 4 (100% Acrylic, 364 yds, 7 oz) Aran or Soft White, 1 skein
G/6 4.25 mm hook
Tapestry Needle for weaving in ends
Polyfil
Safety Eyes 8 mm (2)
Small amount of Black Crochet Thread, or Embroidery Floss
Stitches Used:
Sl st- Slip Stitch
2SC/3SC- Single Crochet Increase, Do 2 or 3 stitches in same stitch to increase.
Special Stitches:
Bobble- Yarn Over, Insert hook into stitch, Yarn Over, Pull Through, Yarn Over, Pull Through 2 loops (2 loops left on hook), *Yarn Over, Insert hook into stitch, Yarn Over, Pull Through, Yarn Over Pull Through 2 loops* (3 loops left on hook) Repeat from * to * 2 more times (5 loops on hook) Yarn over, Pull Through all 5 loops. Bobble made.
BPSC- Back Post Single Crochet
DEC- SC DEC- Using the Invisible Decrease- Insert hook up through front loops of next 2 stitches, yarn over, pull through loops, yarn over, pull through.
HDC3TOG- HDC DEC over 3 stitches. Using the Invisible Decrease- Yarn Over, insert hook up through front loops of next 3 stitches, yarn over, pull through front loops, yarn over, pull through all loops.
Notes:
Pattern is worked in continuous rounds, you won’t join. Use a stitch marker or scrap piece of yarn to keep track of your rounds.

Arms-
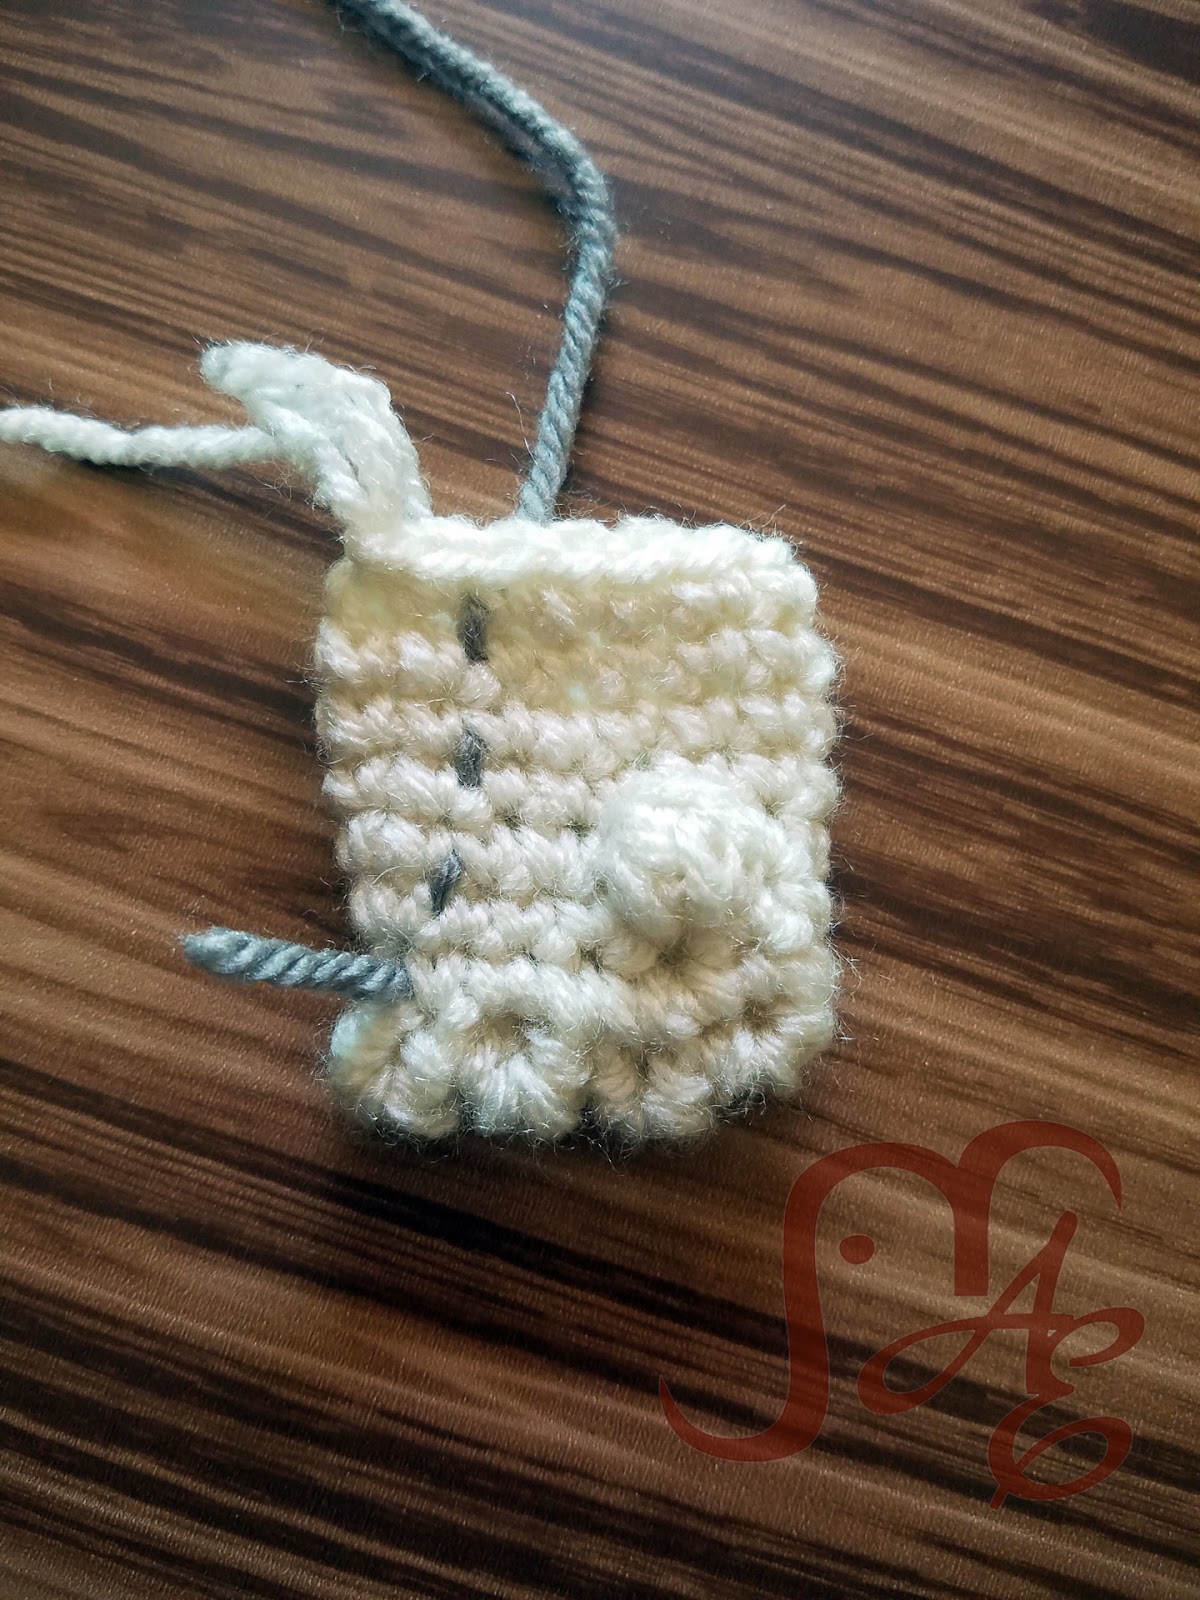
Make 2
Ch 6,
1) In 2nd chain from hook, Bobble (make sure that you push the Bobbles toward you), Bobble, sl st, Bobble, Bobble, Ch (this closes up the bobble) 2SC into the side of the last Bobble. Working on the other side of the chain now, SC 5. (4 Bobbles, 7 SC)
2) 2SC into the side of the first Bobble from round 1, SC in next 4 stitches, (skip chain stitch), 2SC in next, SC in next 6. (14)
3- Left Hand) 2SC in next stitch, SC in next 9, Bobble, SC in next 3. (1 Bobble, 14 SC)
3- Right Hand) 2SC in next stitch, SC in next 12, Bobble. (1 Bobble, 14 SC)
4-7) SC in each around. (15)
8) SC in next, sl st into next. Leave the rest of the round unworked.
Finish Off. You can lightly stuff if you would like. Set aside for now.
Feet-
Make 2
Ch 5,
1) Starting in 2nd chain from hook, 2SC, SC in next 2, 3SC in last chain. Work on the other side of the chain, SC 3 (10)
2) 2SC, 2SC, SC 2, 2SC, 2SC, 2SC, SC 2, 2SC (16)
3) SC, 3SC, SC, 2SC, SC 3, 2SC, SC, 3SC, SC, 2SC, SC 3, 2SC (24)
4) BPSC around next 10 stitches, through both loops-Bobble (tightly chain 1 to close each of the Bobbles in this round), sl st into next stitch, Bobble, sl st, Bobble, sl st, Bobble, sl st, Bobble, BPSC around next 5. (5 Bobbles, 4 sl st, 15 BPSC)
5) SC 10, *(skip chain and sl st) SC into top of next Bobble* Repeat from * to * 4 times. SC 5. (20)
6) SC 10, DEC, SC in next, DEC, SC in remaining 5. (18)
7) SC 8, DEC, HDC3TOG, DEC, SC in remaining 3. (13 SC, 1 HDC)
8-9) SC in each around (14)
10) For the first foot- SC, sl st in next. Leave the rest unworked, finish off. For the second foot- SC in next 2. Don’t finish off, you’ll continue from here to attach the legs and begin the body.
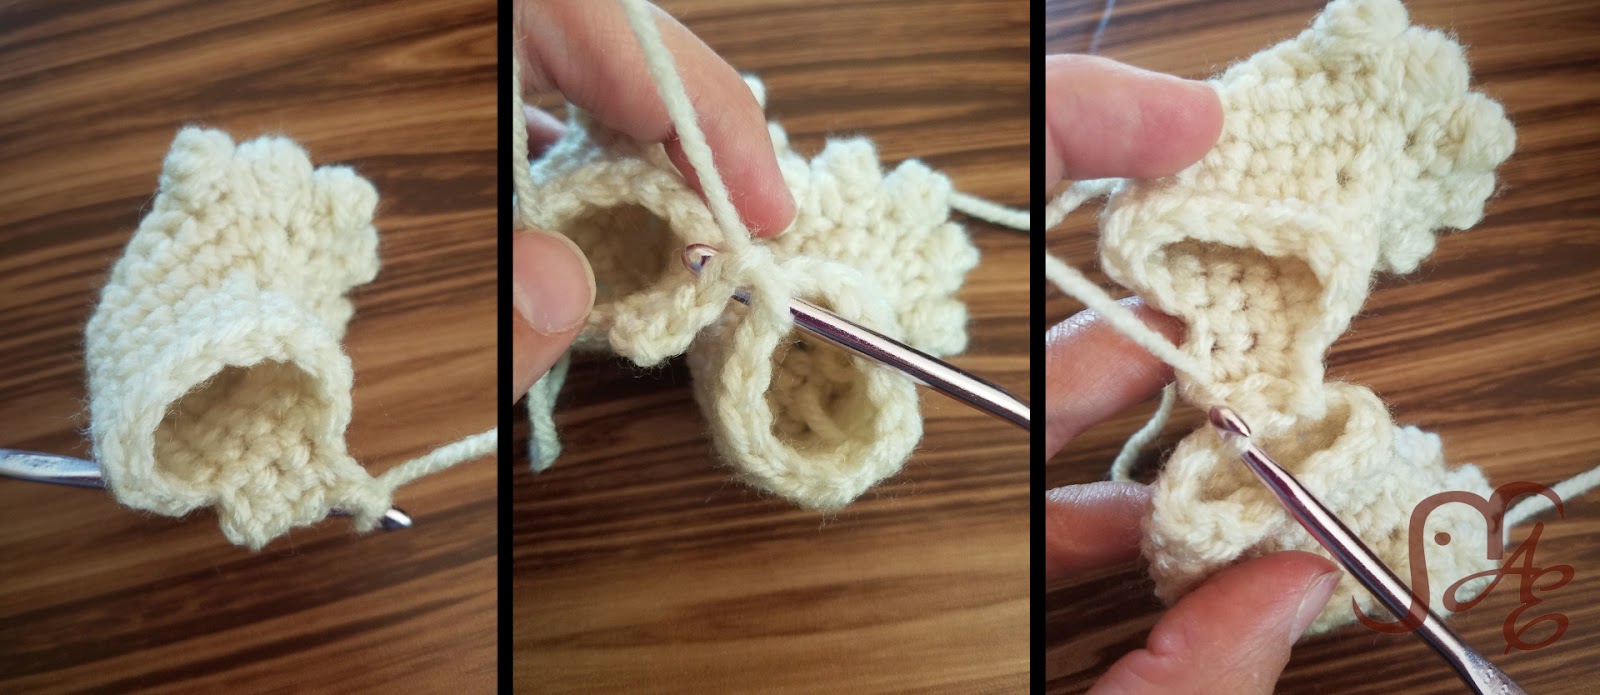
Body-
Connecting section- From Round 10 of your second foot, ch 1 and turn. SC in next 3. Ch 1, turn. Sl st through the first foot (lined up so that they face out the same direction) in the next 3 SC.
Now you’ll go around the outside of the feet and the sides of the connecting section you just made.
Ch 1
1) *SC in next 5, 2SC in next* Repeat from * to * around. SC in last 2. (30)
2) *SC in next 4, 2SC in next* Repeat from * to * around. (36)
3) *SC in next 2, 2SC in next* Repeat from * to * around. (48)
4) SC in next 10, 2SC, SC in next 4, 2SC, SC in next 18, 2SC, SC in next 4, 2SC, SC in remaining 8. (52)
5) SC 15, 2SC, SC in next 25, 2SC, SC in remaining 10 (54)
6-11) SC in each around (54)
12) *SC in next 9, DEC* Repeat from * to * around. SC in last 10. (50)
13) SC around (50)
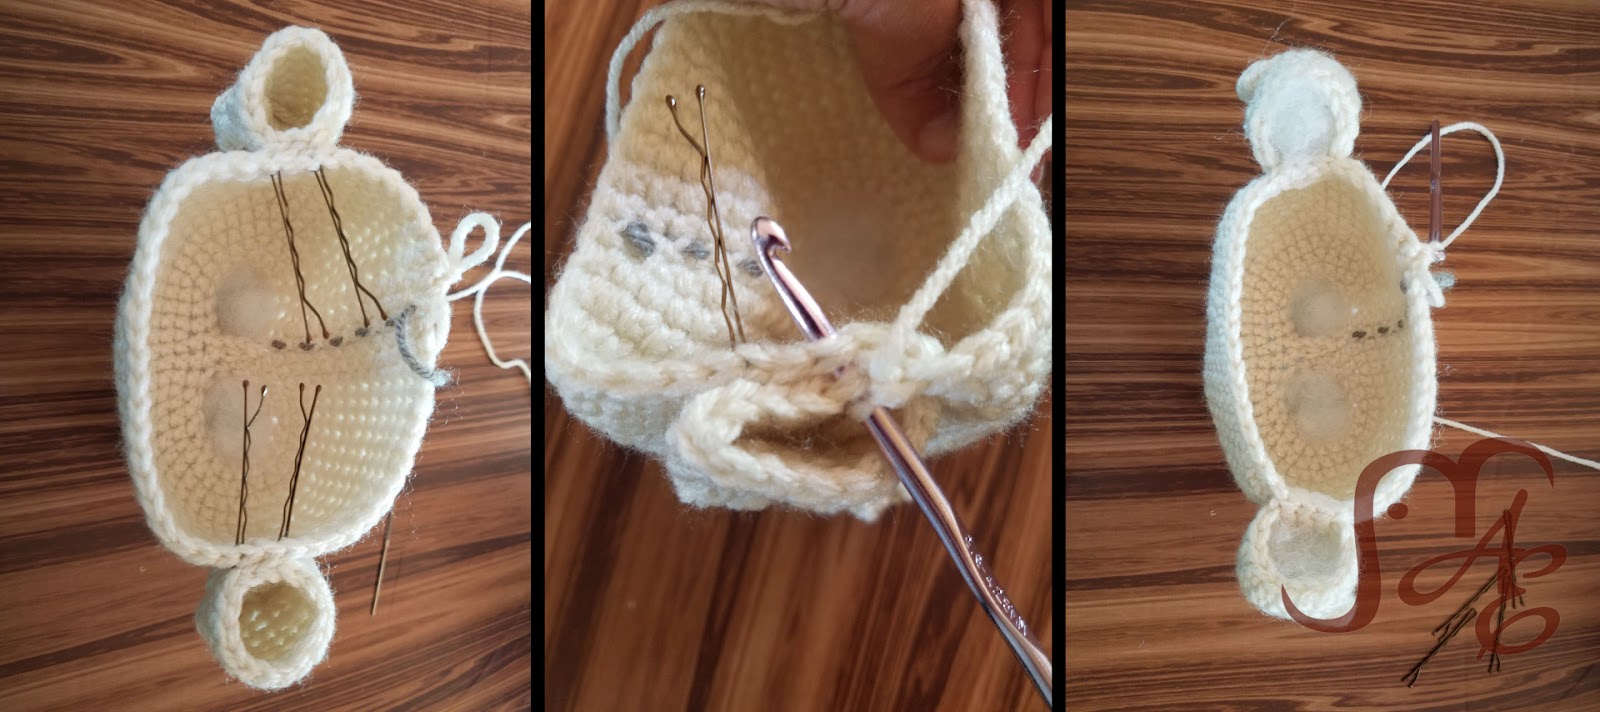
In the next round you’ll be attaching the arms by slip stitching through them into the body. I usually just eyeball the placement slightly front from center on the side of the body, making sure to pay attention to the right and left thumb placement. I use bobby pins actually and pin them in place to get an idea of where they should be. Place the arms where you think they should be and then begin Round 14.
14) The counts here will depend on where you placed your arms. SC until you are 2 Stitches from the arm (about 13 Stitches), DEC (should be over the last two SC before you get to attaching the arm), sl st 4 through the inside of the arm and into the body, DEC, SC 17, DEC, sl st 4 through the inside of the second arm, DEC, SC in last 4. (37 SC, 8 sl st)
15) SC 8, DEC, SC 16 (now going around the outside of the arm and continuing through the front of the body, the attaching slip stitches from the last round will not be worked again) DEC, SC 10, DEC, SC 16, DEC (
16-22) SC in each around
You may want to mark the center of Round 22 (around 31 Stitches in) to note where your eyes will go.
23) *SC in next 9, DEC* Repeat from * to * around. SC in last 10.
24) *SC in next 6, DEC* Repeat from * to * around, SC in last 2.
25-26) SC in each around.
27) *SC in next 10, DEC* Repeat from * to * around, SC in last 8.
28) SC in each around.
29) *SC in next 3, DEC* Repeat from * to * around. SC in last.
Stuff about halfway, just to give him some shape.
30) *SC in next 2, DEC* Repeat from * to * around. SC in last.
Place your eyes in between Round 21 and 22 about 8 stitches apart. To give the sunken eye look, take a strand of the body color stitch around the post of the place you’ll put each eye from the inside and tighten the yarn and knot it. The tighter you pull it the more “sunken” it will look. I like a little bit but too much. You will also need a small amount of black embroidery floss or yarn to stitch on a smile. I like to do this while I can just tie off the ends inside and not worry about weaving them in after.
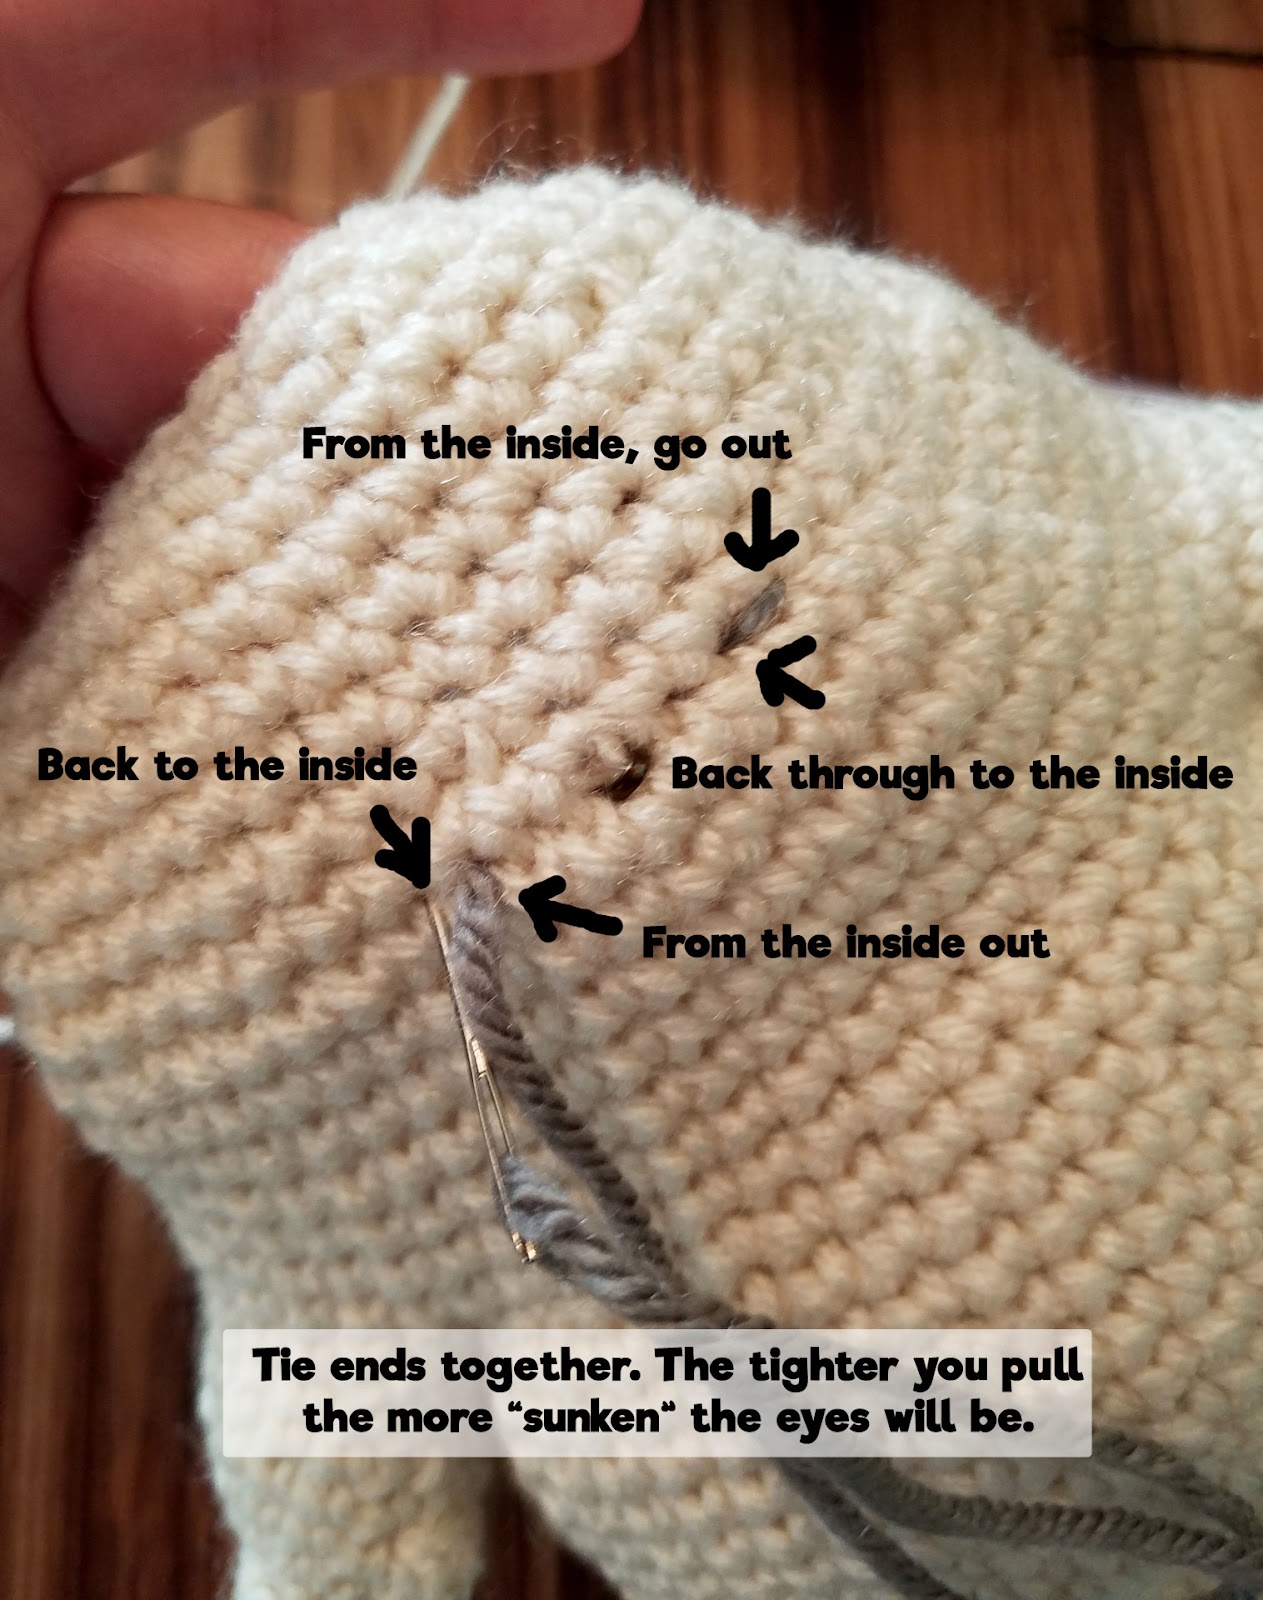
(Grey yarn used for contrast, you should use the same color as the body.)

You will also stuff your ball of fat now. Decide how firm you want your fat ball to be and go with it. I accidentally understuffed one (because I wasn’t paying attention) and actually kind of liked him a little softer. But the firmer ones stand a little better. So it’s your call.
31) *SC in next, DEC* Repeat from * to * around.
32) DEC around.
Finish off, leave tail to sew closed the hole.
And there you have your own little ball of fat to cuddle, display, throw around, whatever your fancy! 🙂