
This post may contain affiliate links. If you use these links to buy something I may earn a small commission at no cost to you. Thanks.
…
Oh Unicorns! I want to say that they are really popular right now but I sort of think they have always been really popular. I remember my Lisa Frank unicorn trapper keeper being pretty awesome back in the day. It would be retro now. Or not. They are definitely on an upswing as of late though. Starbucks and their Unicorn Frappuccino have been all over lately. Good and bad reviews from what I hear. I can’t say that I will be rushing to try one but they do look pretty.
Unicorns are really for everyone but they are especially cute for babies. Of course. Babies make everything (well, most) things cuter. I made this little set per a friend’s request as a baby shower gift.


A couple of disclaimers: This pattern is intended for personal use only. You are welcome to use the pattern to make and sell products, to keep for yourself, or to give away as gifts. I would appreciate receiving credit and a link back to the site, however. Please do not republish or distribute the pattern in any way, or use my photos in your listings.

I am not a robot, so if you find any typos, errors, or places that need clarification, please let me know so that I can fix my mistakes or explain things differently. 🙂
I hope you enjoy this crochet pattern. If you have any questions or comments you can leave them below OR email me at auburnelephant@gmail.com OR through the contact page on this site. I’d also love to see your finished creations! 🙂
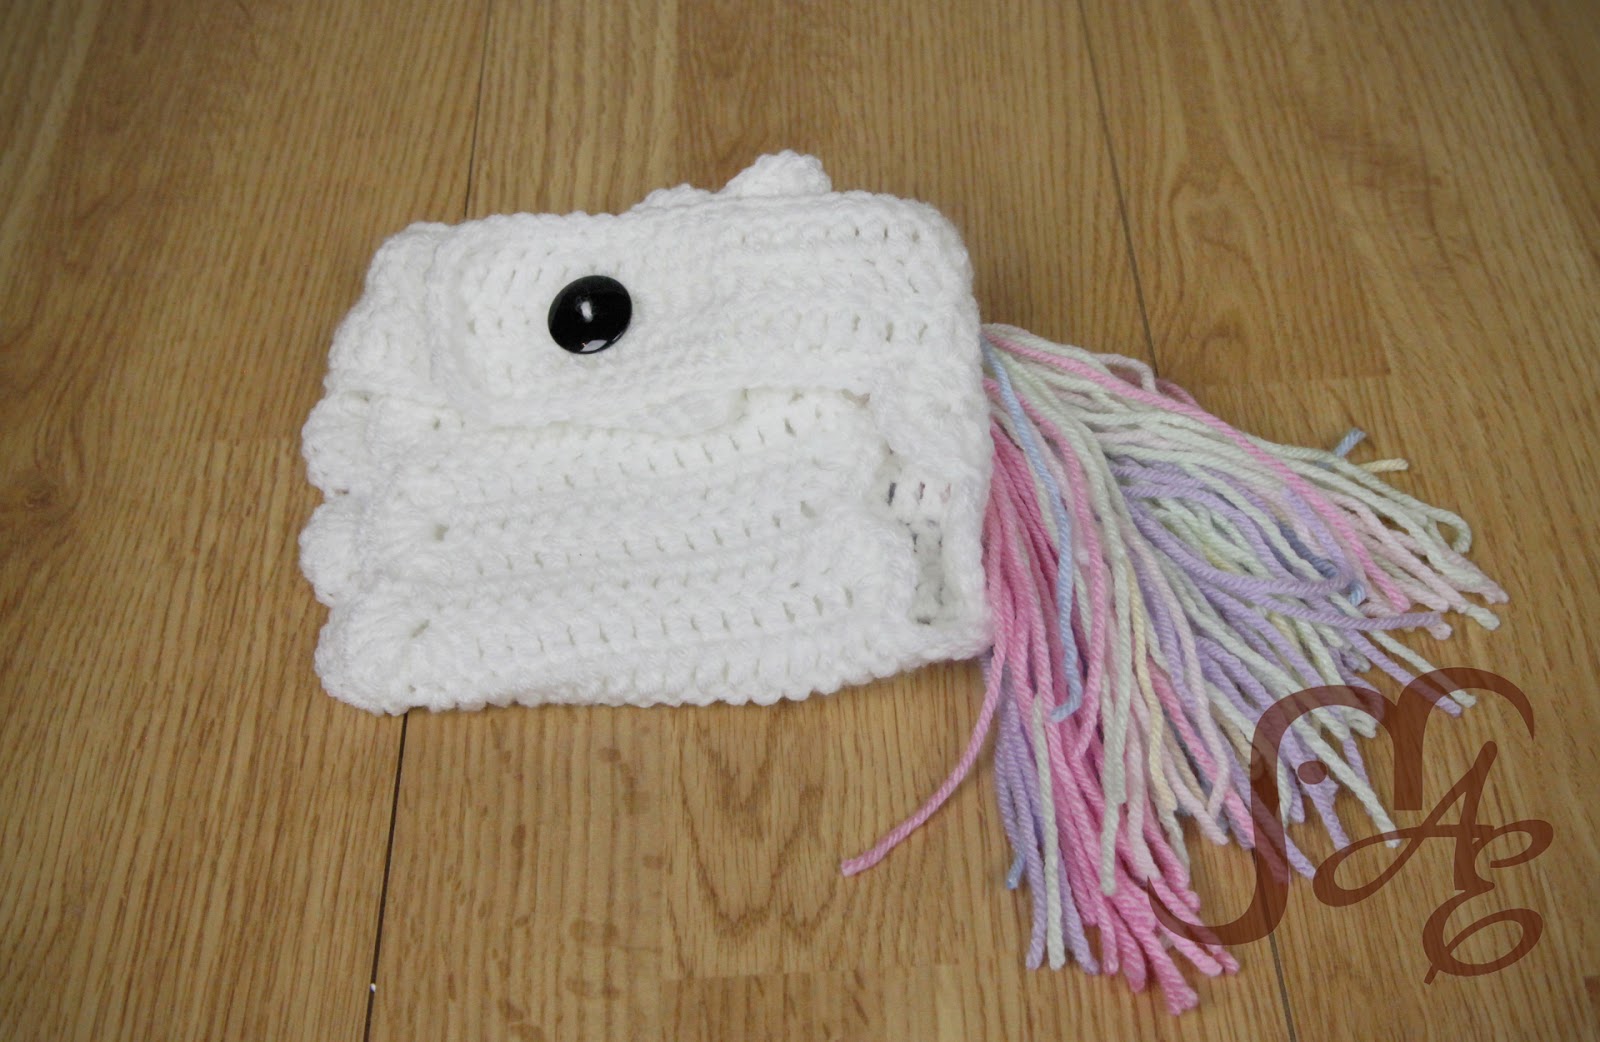
Unicorn Diaper Cover
Supplies Needed:
Worsted Weight (4) Yarn in White
Worsted Weight (4) Yarn in Rainbow Colors (I used more subdued pastel colors, Pink, Yellow, Green, Blue, Purple, and a darker Pink. You can use any combination of colors or a variegated yarn as well.)
H/8 5.0mm Hook
Tapestry Needle
Button
Stitches Used:
Ch-Chain
FSC- Foundation Single Crochet
FDC- Foundation Double Crochet
Shell Stitch- *SC, skip 2 stitches, 5 DC in same stitch, skip 2 stitches* Repeat
Loop Stitch (optional)- Insert hook into stitch, wrap yarn around your finger (or for a long loop-something that you can pull against), yarn over the bottom of the loop, pull through, yarn over, pull through both loops. Watch for a video and photo tutorial.
Note: Diaper Cover is worked in rows, each row will end with a Ch 2 and turn. Chains do NOT count as stitches.
1) FSC 14 (14)
2-9) DC in each across (14)
10) 2DC, DC in next 12, 2DC in last (16)
11) DC in each across (16)
12) 2DC, DC in next 14, 2DC in last (18)
13) 2DC, DC in next 16, 2DC in last (20)
14) 2DC, DC in next 18, 2DC in last (22)
15) DC in each across (22)
16) 2DC, DC in next 20, 2DC in last (24)
17) DC in each across (24)
18) 2DC, DC in next 22, 2DC in last (26)
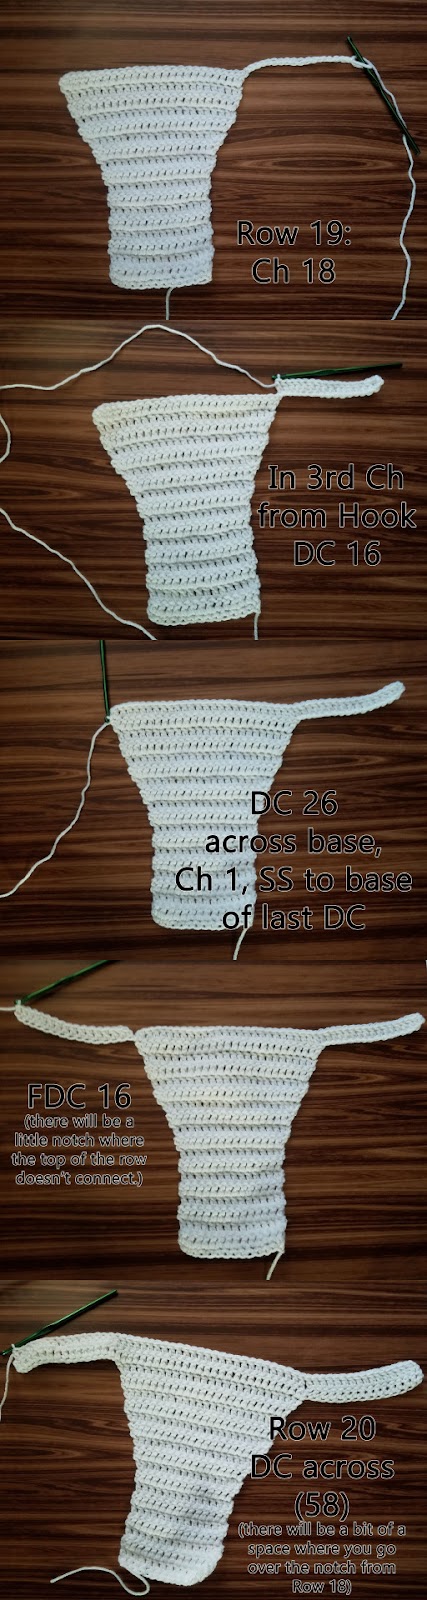
Photo explanation of Rows 19 and 20 below.
19) Chain 18, DC in 3rd Chain from hook, DC 16 down the chain, DC 26 across base, Ch 1, ss to the top of last DC in row 18 (the bottom of the last DC you just made), FDC 16 (58 total- 16 DC into the chain, 26 across the middle, 16 FDC)
20) DC in each across (58)
21) DC in each across (58)
22) SC in each across (58)
Finish Off
Reattach yarn around leg opening, Shell Stitch around. (The count for this will be determined by your placement.)
Sew on a button in the center of the narrow end, make sure that it is small enough to fit through the gaps of the DC. This makes it so that the cover is adjustable.

Tail
Once I mastered the loop stitch I’ve been using it almost exclusively for the hair on my dolls and then these outfits. I like it because even though it might be a little tedious and slow-going to get all the loops made, it is much less so than cutting strips and weaving them in for hair. But, if you would rather do it that way, you definitely could. For the tail, you could just tie on your yarn in the colors and length that you want directly to the diaper cover. Or you can crochet a circle, following the pattern below but substituting SC for the loop stitches, and then tie on or weave in your strips to that. I would probably go with the second way so that you have more control over the placement and fullness of the tail without bunching up the diaper cover.
I suggest pulling the loops for these at least 10-12″ out if you can. I tend to make them long so that I have room to trim it down if needed. It’s easy to trim, not as easy to add on. (Or have to re-do.)
1) In MR, 10 Loop stitches (10)
2) 2 Loop Stitches in each stitch around (20)
3) *2 Loop Stitches in next stitch, Loop Stitch in next* Repeat from * to * around (30)
(With the 6 colors I used, I switched colors every 10 stitches.)
Try to center the tail at the top on the back side of the cover and sew on.
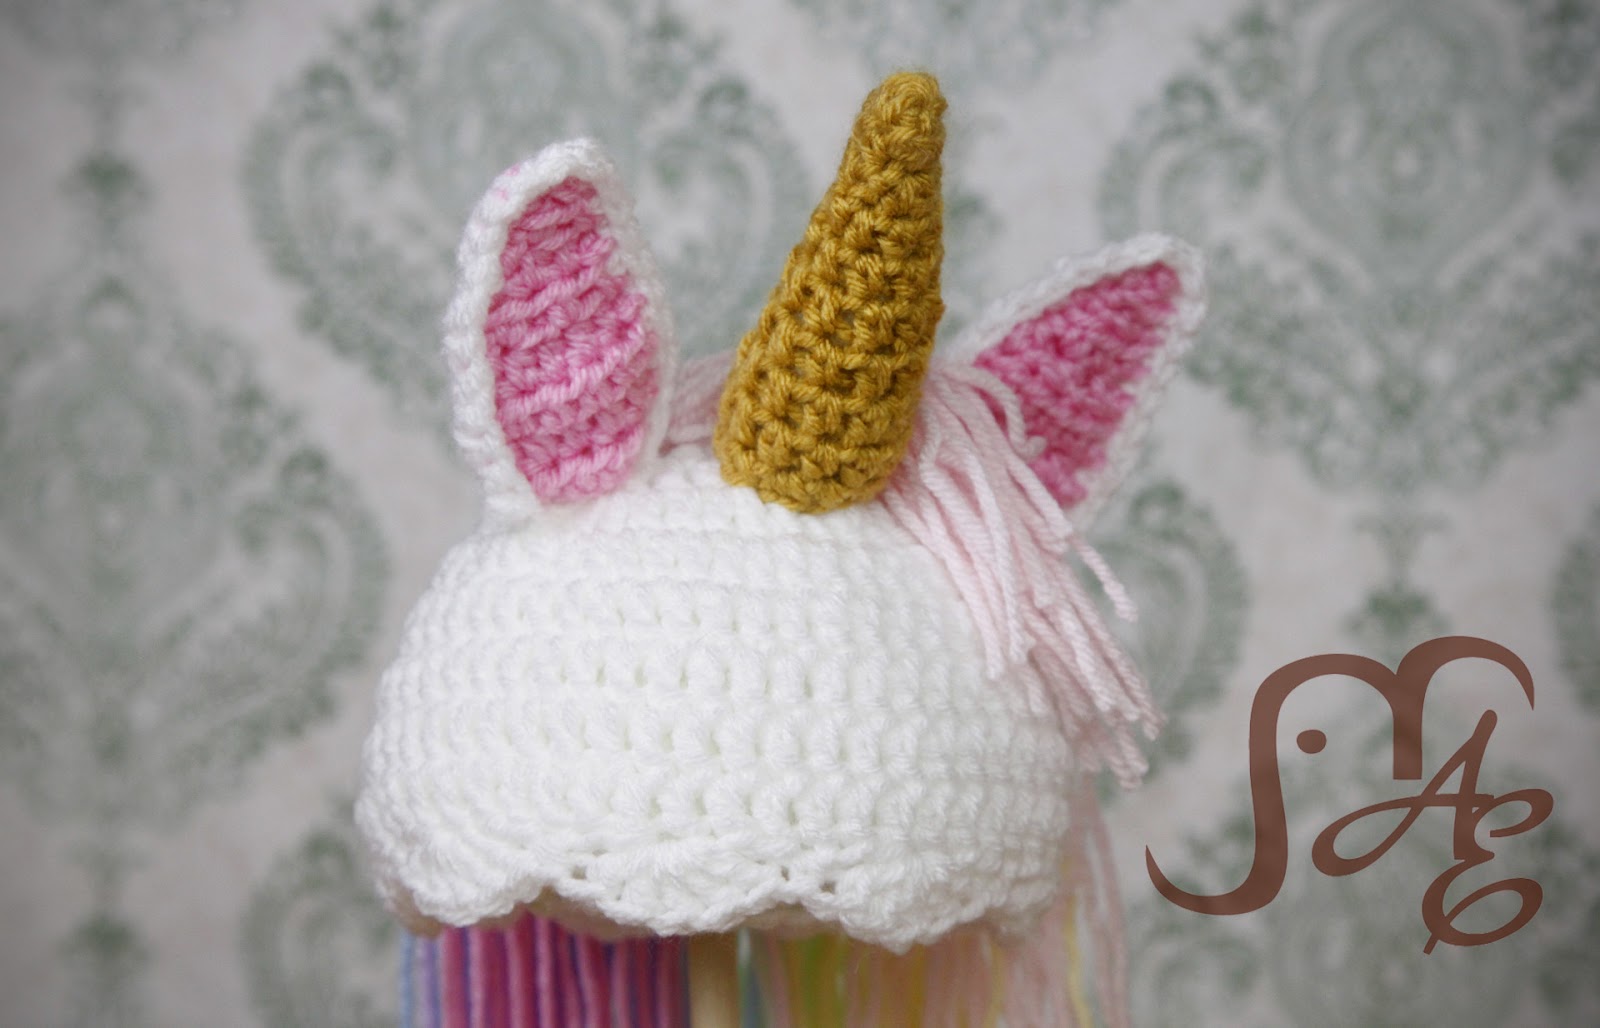
Unicorn Hat
Supplies Needed:
Worsted Weight (4) Yarn in White
Worsted Weight (4) Yarn in Rainbow Colors (I used more subdued pastel colors, Pink, Yellow, Green, Blue, Purple, and a darker Pink. You can use any combination of colors or a variegated yarn as well.)
Worsted Weight (4) Yarn in Gold/Yellow/Silver for the Horn
H/8 5.0mm Hook
Tapestry Needle
Small amount of polyfil stuffing
Stitches Used:
Ch-Chain
Shell Stitch- *SC, skip 2 stitches, 5 DC in same stitch, skip 2 stitches* Repeat
FHDC- Foundation Half Double Crochet
DEC- Decrease over 2 Stitches
HDC3TOG- Half Double Crochet 3 Stitches together, decrease over 3 stitches
Loop Stitch (optional)- Insert hook into stitch, wrap yarn around your finger (or for a long loop-something that you can pull against), yarn over the bottom of the loop, pull through, yarn over, pull through both loops. Watch for a video and photo tutorial.
Note: This pattern is worked in joined rounds. Start each round with a Ch 2 and end each round with a SS to the top of the beginning DC, NOT the chain. Chains do NOT count as stitches.
1) In MR, 10 DC (10)
2) 2DC in each around (20)
3) *DC, 2DC* Repeat from * to * around (30)
4) *DC 2, 2DC* Repeat from * to * around (40)
5) *DC 3, 2DC* Repeat from * to * around (50)
6-9) DC in each around (50)
10) Shell Stitch around
Ears (Outer)
Note: Both parts of the ears (Outer and Inner) are worked in rows. Each Row will end with a Ch 2, turn.
Make 2 in White
1) FHDC 6 (6)
2-4) HDC in each across (6)
5) HDC, Skip 1, HDC in next 2, Skip 1, HDC in last (4)
6) HDC in each across (4)
7) HDC, Skip 1, HDC in last 2 (3)
8) HDC3TOG (1)
Finish Off
Ears (Inner)
Make 2 in Pink
1) FHDC 5 (5)
2-4) HDC in each across (5)
5) HDC, Skip 1, HDC in next, Skip 1, HDC in last (3)
6) HDC in each across (3)
7) HDC, Skip 1, HDC in last (2)
8) DEC (1)
Finish Off
Place Inner and Outer ear together and SC around the outside in White. Leave long tail for sewing onto hat.
Horn
Note: This part is worked in Joined Rounds because I wanted to have a flatter base. Unless noted, each Round starts with a Ch 2 and ends with a SS to the first stitch of the round.
1) In MR, HDC 5 (5)
2) HDC in each around (5)
3) 2HDC, HDC in next 4 (6)
4) HDC, 2HDC in next, HDC in remaining (7)
5) HDC in each around (7)
6) HDC 3, 2HDC in next, HDC in next 2, 2HDC in last (9)
7) HDC in each around (9)
8) 2HDC, HDC in next 4, 2HDC in next, HDC in remaining (11)
9) HDC in each around (11)
10) Ch 1, SC in each around (11)
Finish Off. Leave a long tail for sewing. Lightly stuff.
Mane
If you don’t want to do this using the loop stitch you don’t have to. You wouldn’t necessarily have to crochet a base first, you could just weave/tie in your colors onto the hat itself. I would think that would make it a little harder to center and make even. So I would probably suggest crocheting a patch (using white or one of the mane colors) 2 rows with 6 SC across, an increase row (2SC at the beginning and end of that row), and then as many rows of 8 SC across as you need to reach your length. Then weaving/tying strips of yarn into that to make your mane. The length and color variations are up to you. Like I mentioned, I prefer to leave the loops long so that there’s plenty of room to trim and make adjustments.
1) Ch 7. In 2nd chain from hook, Loop stitch, Loop stitch across (6 loops), Ch 1, turn
2) SS across, Ch 1, turn (6) This row serves mainly as a way to get back to the right side for the next row of loops.
3) Going over the SS row, Loop stitch, SC, Loop stitch, SC, Loop Stitch, SC, Ch 1, turn (You are doing every other stitch as a loop, I found if I did every loop it was really heavy.) (3 Loops, 3 SC)
4) Repeat Row 2
5) Going over the SS row, (SC, Loop stitch) in first, SC, Loop stitch, SC, Loop stitch, (SC, Loop Stitch) in last, Ch 1, turn (You are increasing at the beginning and end of this row. Still doing every other stitch as a loop but offsetting them enough that each row is different and the mane will be fuller.) (4 loops, 4 SC)
6) Repeat Row 2
7) Going over the SS row, *Loop Stitch, SC* Repeat from * to * across. Ch 1, turn (4 Loops, 4 SC)
8) Repeat Row 2
9) Going over the SS row, *SC, Loop stitch, SC* Repeat from * to * across. Ch 1, turn (4 Loops, 4 SC)
Continue Repeating Rows 6-9 until you reach the length you need. For me it was 18 of the loop rows. I didn’t count the slip stitch rows because they only serve to get you back to the other side since the loop stitch will put your loops on the wrong side of your work. I had 6 colors so I switched colors every 3 loop rows.
(If you feel like you need to, you can finish this section off by single crocheting or loop stitching around the outside. If you do the loop stitch, make sure that you are going the right direction so that your edging loops end up on the same side as your loop rows.)
Sewing Together
It’s helpful if you have either a model or stand to place your hat on to make sure the ears and horn go on correctly. If you do not have that option, lay the hat flat, with the seam centered in the back (the mane will cover that up). You may want to pin the ears and horn in place and hold up the hat before you sew them dwon.
The ears should go evenly spaced out from the top center and slightly forward from the fold. The horn should go between the ears and slightly forward.
Center the narrower end of the mane between the ears, back a little from the horn. Sew it down straight from there. Take a few long strips of yarn and tie them on to that narrower end to create the “bangs” of the mane.
You can trim the mane to any length, or brush it out for a fluffier look!


One thought on “Unicorn Photo Set”