
This post may contain affiliate links. If you use these links to buy something I may earn a small commission at no cost to you. Thanks.
…
Once again I’m showing my geeky colors and presenting a Harry Potter-Inspired pattern this time. There’s no need to hide it at this point! 🙂
I had made some little colorful owls for a craft show once and my husband says, you know, if you changed the colors it could be Hedwig. I laughed but then thought about it. That pattern was much more of a cartoon-y hoot owl though and I didn’t like it as a Snowy Owl. So I designed this one. It most definitely doesn’t have to be made as a Hedwig. I just like her. It’s a cute little plush guy to play with or sit on a shelf.
UPDATE (9/24/17) This has been such a popular pattern! It’s awesome! There have been a number of questions about Round 24-26. I’ve added some photos to help explain it better. 🙂 Thanks!

Hedwig the Owl

A couple of disclaimers: This pattern is intended for personal use only. You are welcome to use the pattern to make and sell products, to keep for yourself, or to give away as gifts. I would appreciate receiving credit and a link back to the site, however. Please do not republish or distribute the pattern in any way, or use my photos in your listings.
I am not a robot, so if you find any typos, errors, or places that need clarification, please let me know so that I can fix my mistakes or explain things differently. 🙂
I hope you enjoy this crochet pattern. If you have any questions or comments you can leave them below OR email me at auburnelephant@gmail.com OR through the contact page on this site. I’d also love to see your finished creations! 🙂
Supplies Needed:
G/6 4.25mm Hook
White Worsted Weight Yarn (4)
Small amount of Black Yarn
2 black safety eyes, 8-12 mm (I used 10 mm but a little bigger or smaller would be fine too)
Stitches Used:
SC- Single Crochet
2SC- Single Crochet Increase. Do 2 SC in same stitch to increase.
DEC- Invisible SC decrease.
FLO- Front Loop Only
SC3TOG-Single Crochet Decrease over 3 stitches
Note: This body of the owl is worked in continuous rounds, you will not join. You would do well to use a stitch marker to keep your place. I’ve never had any luck with the little plastic ring style markers. I simply use a scrap piece of yarn to keep my place.
It’s a good idea to read through the pattern before beginning. If you get confused on a step, read the next section and see if that helps explain.
Body
1) MR 6 SC in ring (6)
2) 2SC in each around (12)
3) *SC, 2SC* Repeat from * to * around (18)
4) *SC 2, 2SC* Repeat from * to * around (24)
5) *SC 3, 2SC* Repeat from * to * around (30)
6-10) SC in each around (30)
11) *SC 2, DEC* Repeat from * to * around. SC in last 2 (23)
12) *SC 5, DEC* Repeat from * to * around. SC in last 2 (20)
13) *SC, 2SC* Repeat from * to * around (30)
14) *SC 2, 2SC* Repeat from * to * around (40)
15-16) SC in each around (40)
17) *SC, 2SC* Repeat from * to * a total of 3 times. SC in next 12. *DEC, SC* Repeat from * to * a total of 4 times. SC in last 10 (39)
18-19) SC in each around (39)
20) *SC 2, DEC* Repeat from * to * a total of 2 times. SC in each remaining (37)
21) *SC, DEC* Repeat from * to * a total of 2 times. SC in each remaining (35)
22-23) SC in each around (35)

You should be able to tell which side is the front chest of the bird. Put the safety eyes on now while you can reach inside. The best part about the owl is that you don’t have to get the eyes centered! YAY! Centering is the worst. In fact, I think it looks cuter if the eyes are on the side a bit so it looks like the owl is turning its head. I aim to get the eyes in Round 7 about 5 stitches apart.
You can also stitch on the beak at this point. Cut a length of black yarn and thread through yarn needle. (I actually prefer tapestry needles instead of the big plastic yarn ones. But use what you like.) The beak is simple. Start centered between the eyes in the same row and straight down over a couple rows, go around 3 or 4 times. Tie off.
24) FLO *SC, 2SC* Repeat from * to * a total of 4 times. Through both loops the rest of the round, SC in next 8, DEC 6 times, SC in last 7 (33)
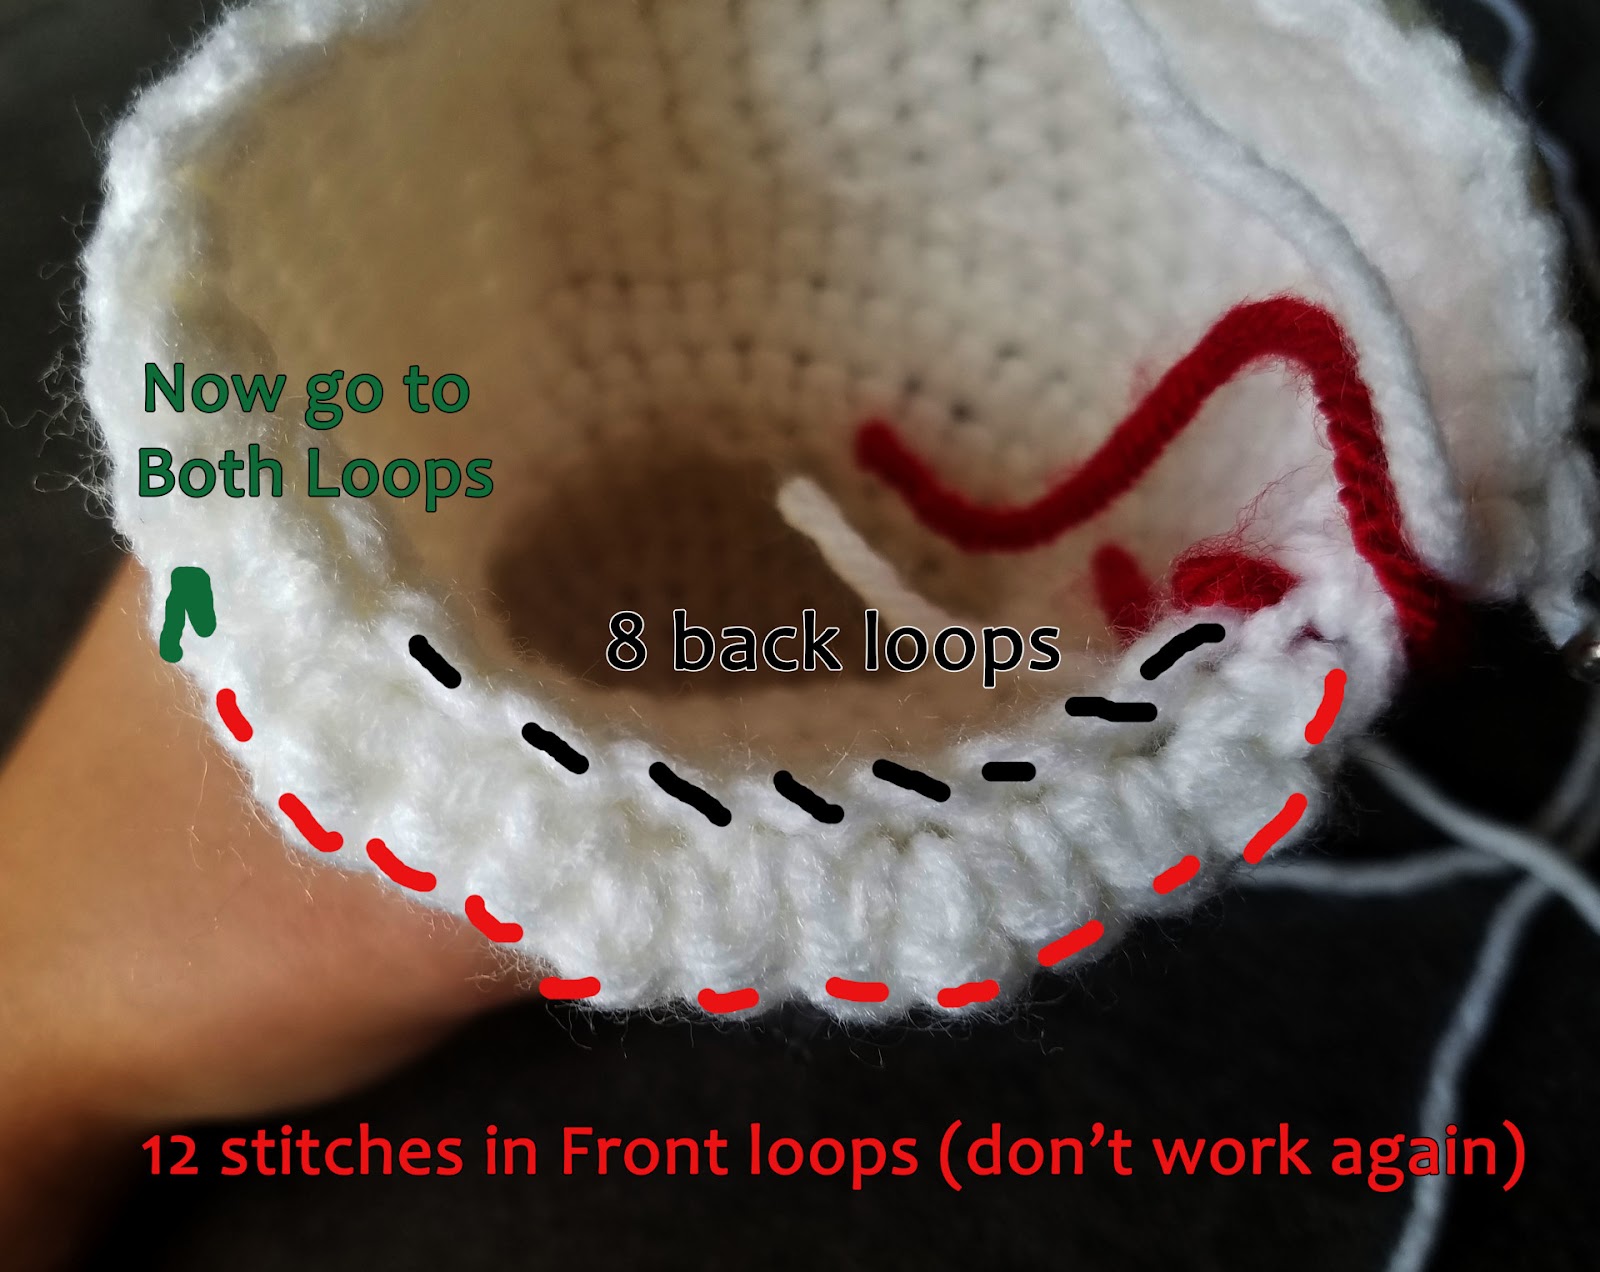
After Round 24
25) In the unworked back loops of Row 24 (should be 8 back loops) then through both loops; *SC 3, DEC* Repeat from * to * around. SC in last 4 (24)
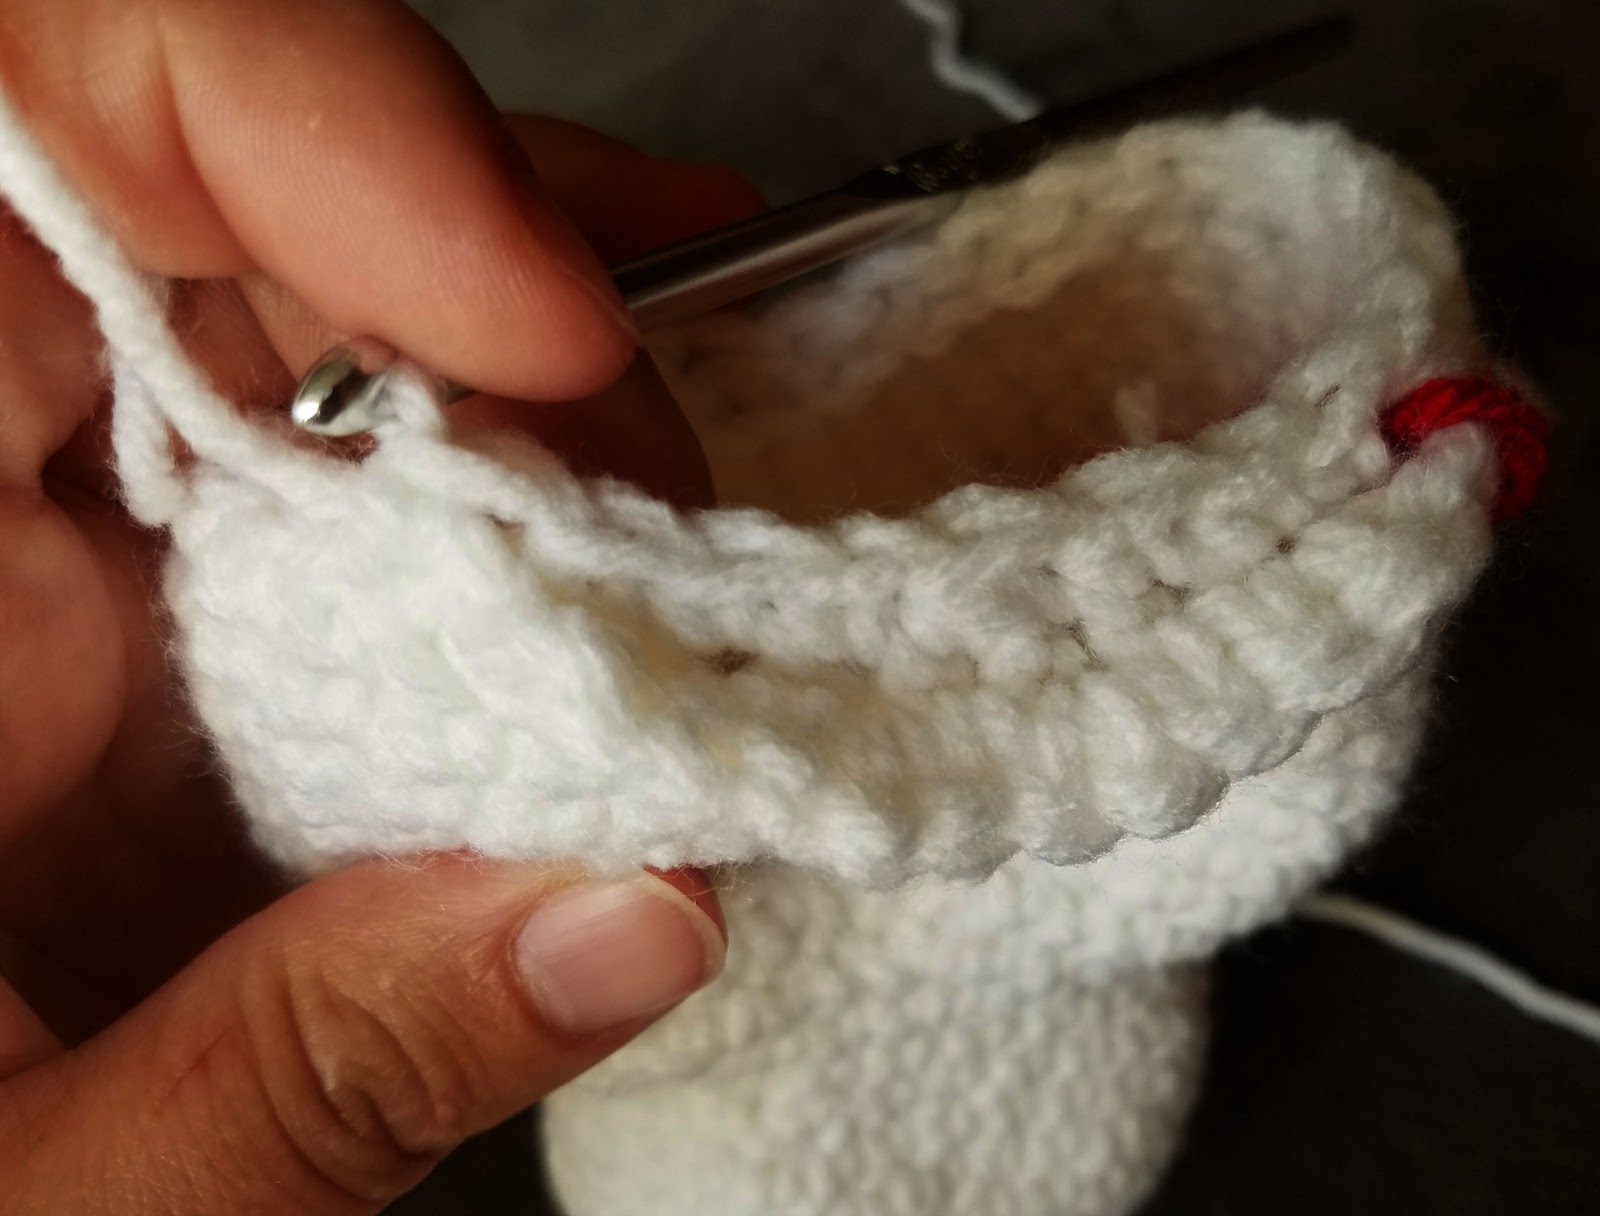
After Round 25
26) *SC 2, DEC* Repeat from * to * around (18)

After Round 26
Stuff with poly fil
27) *SC, DEC* Repeat from * to * around (12)
28) DEC around (6)
Finish off, leaving long tail to sew last hole shut. Finish stuffing if needed. Weave in ends.
Wings
The look of these wings can be accomplished a couple of ways. Use White for the whole wing and use a needle and black yarn to stitch the V shaped black specks. OR you can can do a pull through of black to give it the V shapes. Do this by inserting hook into the stitch, yarn over with Black yarn, pull through, yarn over with White yarn and pull through to finish the single crochet. Do the next stitch in all white, but carry over the black yarn. The wrong side will be sewn down to the body of the owl so you won’t notice if the color changes get messy.
The wings are worked in rows, each row ends with a Ch1 and turn.
Left wing
Ch 3
1) SC in 2nd Ch from hook, SC (2)
2) 2SC, 2SC (4)
3) 2SC, SC, SC, 2SC (6)
4) SC in each across (Do 2 black pull through stitches on this row. Starting in White- SC, SC, In black- SC, In White- SC, In Black- SC, In White- SC. Space out the black stitches) (6)
5) 2SC, SC in last 5 (7)
6) SC 6, 2SC in last (Do 3 black pull through stitches on this row. Again spacing them out evenly.) (8)
7) SC across (8)
8) SC across (Do 4 black pull through stitches on this row. Again spacing them out evenly) (8)
9) DEC, DEC, SC in last 4 (6)
10) SC 4, DEC (Do 2 black pull through stitches on this row.) (5)
11) DEC, DEC, SC (3)
12) SC across (Do 1 black pull through stitch.) (3)
13) SC3TOG (1)
14) SC (1)
15) SC evenly around the edge of the wing, SS to first SC. Finish off, leave long tail for sewing.
Right wing
Ch 3
1) SC in 2nd Ch from hook, SC (2)
2) 2SC 2SC (4)
3) 2SC, SC, SC, 2SC (6)
4) SC (Do 2 black pull through stitches on this row. Starting in White- SC, In black- SC, In White- SC, In Black- SC, In White- SC, SC. Space out the black stitches) (6)
5) SC 5, 2SC (7)
6) 2SC, SC in last 6 (Do 3 black pull through stitches on this row. Again, spacing out the black stitches evenly.) (8)
7) SC across (8)
8) SC across (Do 4 black pull through stitches on this row. Spacing out the black stitches evenly) (8)
9) SC 4, DEC, DEC (6)
10) DEC, SC in last 4 (Do 2 black pull through stitches on this row.) (5)
11) SC, DEC, DEC (3)
12) SC across (Do 1 black pull through stitch on this row.) (3)
13) SC3TOG (1)
14) SC (1)
15) SC evenly around the edge of the wing, SS to first SC. Finish off, leave long tail for sewing.

Line up the bottom part of the wing parallel with the bottom of the owl and sew each side on.
And there you go! You have your very own Hedwig or pet snowy owl! You could also use brown and make different owl varieties!

Hi!
I have got to step 23. Can I check that the back of hedwig is where the working end/last and first stitches are?
Hi Nicola!
Yes, the rounds should start and end on the backside. I hope that helps!
Thanks,
Erin 🙂
At row 17, which *to* is the second repeat? I cannot get 39 stiches no matter what it try…
Hi! In Round 17, the second repeat is just the *DEC, then SC in next*. The first repeat gives you 3 increases, the second repeat gives you 4 decreases so you should end with one less than the round before, which was 40.
I hope that helps!
Thanks!
Hi I have gotten to row 25 and would appreciate it if you could explain how it works. Thank you so much!!
Hi! This part can be a bit tricky. So after Round 24, you should have 33 stitches, but you are only going to work 29 of those for Round 25. The 12 stitches that you did in the FLO won’t be worked again, only the 8 unworked Back Loops. To start Round 25, you’re going to use those 8 Back Loops and then continue around through both loops, repeating *SC in next 3, then decrease* around and then SC in the last 4 of the round. So on those back loops, you’ll do SC 3, DEC, SC 3, then back to both loops for the next DEC. Does that make sense?
I hope that helps. Let me know if you have any other questions! Thanks! 🙂
I have done round 25 3 times and every time I end up with 25 instead of 24…. I’m counting my stitches and doing (Inc in3 dec)….. What am I doing wrong??? I’m so confused….
Hi! I’m sorry you’re having trouble here. I think most issues come when switching from the Back Loops back to both loops. When you get back to both loops are you doing a decrease first and then continuing the (SC in next 3, DEC) repeat again?
If that’s not it, I’m not sure what else could be happening. My other suggestions would be to simply end the round with an extra decrease to get the stitch count correct or continue with the rounds and simply have an extra stitch at the end. Since this is closing up the bottom of the owl, it won’t effect the shaping.
I hope that helps! Thanks!
Hi, I am so sorry it took so long to reply. Yes it helped out tremendously and I’ve completed it for my son who absolutely loves it. Thank you so much!
That’s great! You’re very welcome! 🙂
Hi! This was SO amazing! It’s the first time I could understand and make a big amigurumi, I’m so excited!! This Hedwig is so cute!!!!
I’m having trouble with the wings, the only problem I had. I can’t understand how to continue after the chains and the SC.
Thank you for sharing this proyect!
Hi! Thank you! I’m glad you like the pattern! 🙂
For the wings, you’ll start with a base of 2 SC, the 2nd and 3rd rows are 2 increases (2SC), then it will increase and decrease on one side for the shaping (different for the left and right wings). You can either do it all in white and then use a needle to stitch on the black Vs or use the pull through method (I explain how at the top of the Wing section of the pattern).
I hope that’s helpful. Let me know if you have other questions! 🙂
Yes! I undestood, thank you so much. I’m doing now the second wing, and tomorrow will start a new Hedwig. I will give them as gifts for my friends, and make some more of your projects for myself! I loved your page.
Thank you!!
Love this pattern – thank you so much for sharing. I made it today and am really pleased with how it turned out. Made as a Christmas gift for my cousin’s Harry Potter mad son.
That’s great! Thank you! I’m sure he will love it. 🙂
Hi I love this pattern my owls turned out great, I’m giving them away as Christmas gifts this year. I wanted to know if it’s okay to sell the owls I make on etsy? I would make sure to post a link to your pattern page to credit you as the pattern designer. I also wanted to know if you have a Instagram page so I can tag you when I post photos. Thanks for the cute design.
Hi! I’m so glad you like the pattern. These will be great gifts!
And you’re welcome to sell any you make! Credit and a link would be great. 🙂
You can find me on IG @auburnelephant!
Thanks again and good luck!
Heyyy, would it be okay with you if I could sell this online?
Hi! You are welcome to sell any items you make from this pattern for sure.
Hi I really love thankyou this and i am making in fluffy yarn for my little sister I hope she likes !
Yay! I’ve seen other people make this with fluffy yarn and it is adorable! I’m sure your sister will love it. 🙂
I am really having a hard time crocheting round 25 I think. Does round 25 go inside the body or is it supposed to stick outside? I crochet differently than most and my BLO/FLO is usually switched around. I did it your way and the way I crochet the BLO the part from round 24 gets tucked into the body on the inside with the stuffing. Its hard to tell from your photos. Is this part supposed to be the tail? Please help if you can. Thank you.
Hi Stephanie! It sounds like when you crochet you are working the piece “inside out.” When I’m crocheting in the round, the Right Side is the side closest to me and the round is worked clockwise. The FLO section in Round 24 is meant to be the tail. If you do those FLO stitches as BLO it should line up. You want the unworked loops to be toward the inside of the owl. Does that make sense? It’s tricky to explain. I hope it helps.
What size is the finished product?
Hi! Sorry for the late reply. Hedwig should come out to be about 5 inches tall. Thanks!